# Hosted payment page overview and quickstart
> Build payment pages with no code, send to customers, and get paid with limited effort
Payabli's hosted payment pages are secure, configurable checkout pages that your customers can use to pay you. Hosted payment pages let you provide secure pages with built-in payment experience without any development effort required. After you configure a payment page, you only need to pass along the specific field data needed, allowing your customer to have a seamless checkout experience. You can build as many payment pages as your paypoint needs. Give your customers payment page links or iframe payment page content in your website or landing pages.
We don't recommend embedding a hosted payment page in an iframe, as it can lead to unexpected behavior and performance issues.
 ## Features and benefits
Leveraging Payabli's hosted payment pages provides benefits to partners, merchants, and their paying customers:
* Configure the fields to display, then prefill them using URL parameters
* Integrated security that reduces your PCI scope
* Customize pages with your logo and brand colors
* Decide payment options to give to your customers
* Redirect the payor and capture authorization data in real time.
Get started with hosted payment pages in 4 steps.
## Step 1: Create a payment page
Create a payment page from PayHub or via the API.
* To create a payment page from PayHub, navigate to **Payment Pages** and click **+ New Payment Page**.
* To create a payment page via the API, send a POST request to `/api/Paypoint/{entry}` and include the required fields. See the [Create a payment page API reference](/developers/api-reference/hostedpaymentpages/create-a-payment-page) for details.
You can also manage payment pages with the API:
* [Get payment page details](/developers/api-reference/hostedpaymentpages/get-payment-page-details)
* [Get all payment page details](/developers/api-reference/hostedpaymentpages/get-all-payment-page-details)
* [Delete a payment page](/developers/api-reference/hostedpaymentpages/delete-a-payment-page)
## Step 2: Prefill fields
Payabli has two different data injection via URL methods that you can use to prefill various fields like amount, description, invoice number, and customer number.
**1. Query string:** You can pass the fields into the payment page via URL.
**2. JSON:** For advanced use cases, you can prefill more details by passing the corresponding data via a Base64-encoded JSON file.
You can include the following fields in the URL, to prefill the payment page:
Prefilled amount on the payment page.
## Features and benefits
Leveraging Payabli's hosted payment pages provides benefits to partners, merchants, and their paying customers:
* Configure the fields to display, then prefill them using URL parameters
* Integrated security that reduces your PCI scope
* Customize pages with your logo and brand colors
* Decide payment options to give to your customers
* Redirect the payor and capture authorization data in real time.
Get started with hosted payment pages in 4 steps.
## Step 1: Create a payment page
Create a payment page from PayHub or via the API.
* To create a payment page from PayHub, navigate to **Payment Pages** and click **+ New Payment Page**.
* To create a payment page via the API, send a POST request to `/api/Paypoint/{entry}` and include the required fields. See the [Create a payment page API reference](/developers/api-reference/hostedpaymentpages/create-a-payment-page) for details.
You can also manage payment pages with the API:
* [Get payment page details](/developers/api-reference/hostedpaymentpages/get-payment-page-details)
* [Get all payment page details](/developers/api-reference/hostedpaymentpages/get-all-payment-page-details)
* [Delete a payment page](/developers/api-reference/hostedpaymentpages/delete-a-payment-page)
## Step 2: Prefill fields
Payabli has two different data injection via URL methods that you can use to prefill various fields like amount, description, invoice number, and customer number.
**1. Query string:** You can pass the fields into the payment page via URL.
**2. JSON:** For advanced use cases, you can prefill more details by passing the corresponding data via a Base64-encoded JSON file.
You can include the following fields in the URL, to prefill the payment page:
Prefilled amount on the payment page.
Example: `100.45`
Option that allows the user to edit the amount to pay. When `true`, the amount is editable.
Option that allows you disable autopay options when autopay is active by payment page configuration.
Allowed values: `0`= autopay disabled
Example: `0`
Payor is an array of options to allow overwriting the payor information by input field like "first name", you can overwrite the value (value) in the field and `readonly` property of the input (fixed). If fixed is (1) the input is blocked and the user can't write.
Option that controls acceptance of credit or debit card. If the paypoint is only set up to accept card payments it won't be disabled.
Allowed values: `0`= disabled `1`= enabled
Example: `1`
Option that controls acceptance of ACH. If the paypoint is only set up to accept ACH payments, it won't be disabled.
Allowed values: `0`= disabled `1`= enabled
Example: `1`
Option that controls acceptance of Apple Pay. To accept Apple Pay, you must first [activate it](/guides/pay-in-developer-wallets-apple-pay-enable), and the payment page must have `card` enabled.
Allowed values: `0`= disabled `1`= enabled
Example: `1`
Name of business
Example: `Acme, Inc`
Customer first name
Example: `John`
Customer last name
Example: `Smith`
Email address of customer and where receipt will be sent.
Example: `email@example.com`
Primary phone number of customer making payment. Don't include dash characters.
Example: `8005555555`
Number or reference to customer identification in your system of record.
Example: `1409`
Invoice number to apply payment to.
Example: `INV-12345`
Billing address of customer.
Example: `123 Walnut Street`
Shipping address of customer.
Example: `123 Walnut Street`
Custom fields, configured for your payment page. You can include as many custom fields you need. If you create a custom field, the Field ID will use the naming convention of `additional_` followed by a unique name. If the name matches a custom field defined in the paypoint, it will point to that custom field. The following JSON shows a custom field called `salesRep` in the body.
Example: `"payor": { "company": { "value": "Blue Turtle", "fixed": 0 }, "firstName": { "value": "Cyril", "fixed": 0 }, "lastName": { "value": "Methodius", "fixed": 0 }, "billingEmail": { "value": "cyril@boardhaus.com", "fixed": 0 }, "billingPhone": { "value": "8009998765", "fixed": 0 }, "invoiceNumber": { "value": "12345", "fixed": 0 }, "customerNumber": { "value": "98756", "fixed": 0 }, "billingAddress1": { "value": "12764 Testing Way", "fixed": 0 }, "shippingAddress1": { "value": "12764 Testing Way", "fixed": 0 }, "additional_salesRep": { "value": "Mihail Bulgarski" } }`
This option allows redirection to another URL after payment is processed and the user clicks on the button at the end of Payment Receipt. The payment response is appended to the end of URL (Callback).
Example: `{callbackUrl}/?authCode=123456&referenceId=2-28b0fc7&resultCode=1&resultText=Approved&customerId=705`
## Step 3: Data injection
Select data injection method. You can use either the query string or JSON method to pass data to the payment page.
### Query string
Pass the page configuration via the URL in normal query string format.
Data passed through via query string can't be edited by the payor. If you want the payor to be able to edit information, use the JSON method.
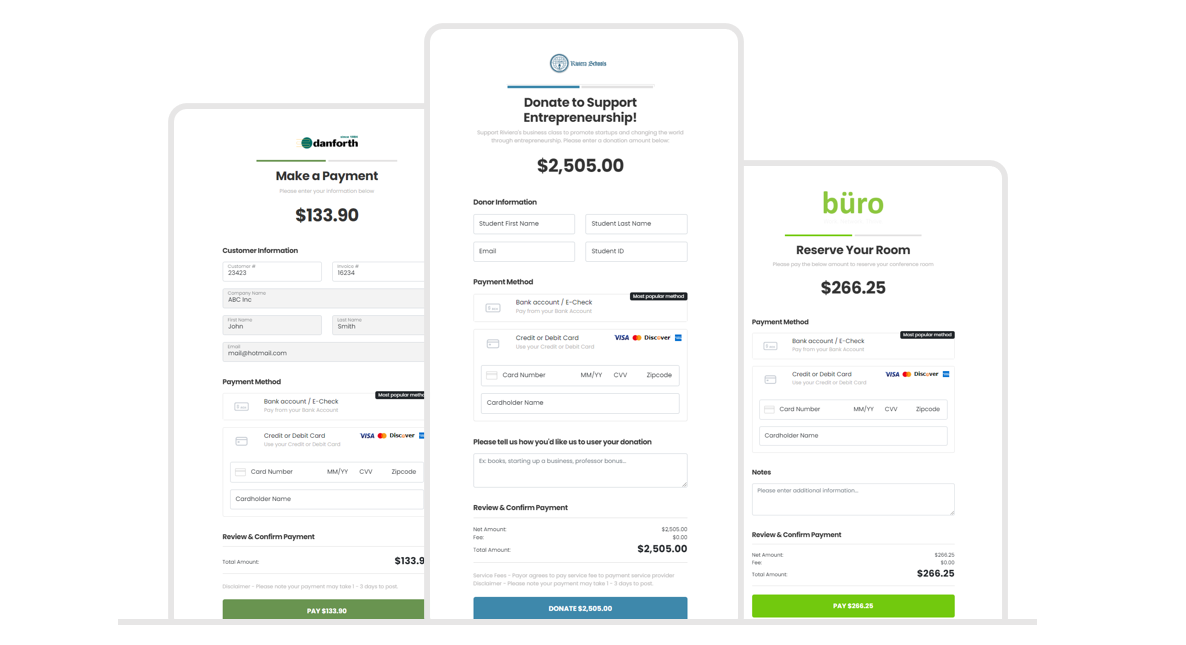
In this example, the `amount` is 133.9, `autopay` is 0, which means false, `card`, `ach`, and `applepay` are enabled, the `company` is Acme, Inc. The customer `firstName` is John, `lastName` is Smith, the `billingEmail` is [mail@hotmail.com](mailto:mail@hotmail.com), and the `billingPhone` is 9541234567. Note that text is URL-encoded.
```txt
https://paypages-sandbox.payabli.com/boardhaus/1664810006928?amount=133.9&autopay=0&card=1&ach=1&applepay=1&company=Acme,%20Inc&firstName=John&lastName=Smith&billingEmail=mail@hotmail.com&billingPhone=9541234567
```
### JSON
For more complex needs, like adding line items to a payment page, Payabli recommends sending the page configuration options via JSON. Add the configuration to the end of the URL of the payment page using Base64 encoding. For example:\
`{Payment Page URL}/json/{Base64 JSON config}`
In the encrypted JSON, you must replace the characters "/" and "+" with "\_" and "." respectively to avoid problems in the format of the URL.
The FieldIDs are the same as the Query String version.
**Example:**
```json
{
"autopay": 0,
"card": 1,
"ach": 1,
"applepay": 1,
"callbackUrl": "boardhaus.com",
"amount": 200.76,
"invoiceNumber": "100012",
"payor": {
"company": {
"value": "Blue Turtle",
"fixed": 0
},
"firstName": {
"value": "Cyril",
"fixed": 0
},
"lastName": {
"value": "Methodius",
"fixed": 0
},
"billingEmail": {
"value": "cyril@boardhaus.com",
"fixed": 0
},
"billingPhone": {
"value": "8009998765",
"fixed": 0
},
"invoiceNumber": {
"value": "12345",
"fixed": 0
},
"customerNumber": {
"value": "98756",
"fixed": 0
},
"billingAddress1": {
"value": "12764 Testing Way",
"fixed": 0
},
"shippingAddress1": {
"value": "12764 Testing Way",
"fixed": 0
}
}
}
```
**Example:**
The JSON in the example has been Base64-encoded:
```txt
https://paypages-sandbox.payabli.com/snowmountainmaintenance/1670240442714/json/ewoJImF1dG9wYXkiOiAwLAoJImNhcmQiOiAxLAoJImFjaCI6IDEsCgkiY2FsbGJhY2tVcmwiOiAiYm9hcmRoYXVzLmNvbSIsCgkiYW1vdW50IjogMjAwLjc2LAoJImludm9pY2VOdW1iZXIiOiAiMTAwMDEyIiwKCSJwYXlvciI6IHsKCQkiY29tcGFueSI6IHsKCQkJInZhbHVlIjogIkJsdWUgVHVydGxlIiwKCQkJImZpeGVkIjogMAoJCX0sCgkJImZpcnN0TmFtZSI6IHsKCQkJInZhbHVlIjogIkN5cmlsIiwKCQkJImZpeGVkIjogMAoJCX0sCgkJImxhc3ROYW1lIjogewoJCQkidmFsdWUiOiAiTWV0aG9kaXVzIiwKCQkJImZpeGVkIjogMAoJCX0sCgkJImJpbGxpbmdFbWFpbCI6IHsKCQkJInZhbHVlIjogImN5cmlsQGJvYXJkaGF1cy5jb20iLAoJCQkiZml4ZWQiOiAwCgkJfSwKCQkiYmlsbGluZ1Bob25lIjogewoJCQkidmFsdWUiOiAiODAwOTk5ODc2NSIsCgkJCSJmaXhlZCI6IDAKCQl9LAoJCSJpbnZvaWNlTnVtYmVyIjogewoJCQkidmFsdWUiOiAiMTIzNDUiLAoJCQkiZml4ZWQiOiAwCgkJfSwKCQkiY3VzdG9tZXJOdW1iZXIiOiB7CgkJCSJ2YWx1ZSI6ICI5ODc1NiIsCgkJCSJmaXhlZCI6IDAKCQl9LAoJCSJiaWxsaW5nQWRkcmVzczEiOiB7CgkJCSJ2YWx1ZSI6ICIxMjc2NCBUZXN0aW5nIFdheSIsCgkJCSJmaXhlZCI6IDAKCQl9LAoJCSJzaGlwcGluZ0FkZHJlc3MxIjogewoJCQkidmFsdWUiOiAiMTI3NjQgVGVzdGluZyBXYXkiLAoJCQkiZml4ZWQiOiAwCgkJfQoJfQp9Cg==
```
## Step 4: Use the link for payments
Send or embed the link you created to accept payments on a prefilled payment page.
## Related resources
See these related resources to help you get the most out of Payabli.
* **[Activate Apple Pay (API)](/guides/pay-in-developer-wallets-apple-pay-enable)** - Learn about setting up Apple Pay via the Payabli API