# Manage customers in the UI
> Add and manage customer records in PayHub. Store payment methods, view transaction history, create payments and autopays, and organize customer data with custom fields and identifiers
In Payabli, customers are the entities that buy goods and services and make payments to your paypoints (merchants). This guide explains how to add and manage customers with the UI.
To access the customers screen, navigate to **Money In > Customers**. This action opens the *All Customers* view. This is where you can locate and edit information for any of your customers. You can also see an up-to-date total count of all your customers here.
For each customer record, you can:
* Create a payment
* Create an autopay
* Quick view
* View customer
* Edit customer
* Add a payment method
* Delete a customer
To see all options for managing an individual customer, click the three-dot icon in the **Actions** column.
## Add a customer
To add a customer from the UI, follow these steps:
1. Navigate to **Customer** and click the **+** icon.
2. Enter the required fields, and save your work.
You can add customers only at the paypoint level. If you don't see the **+** icon, you may not have the necessary permissions to add a customer, or you may be logged into an organization.
## View a customer record
The customer record contains details about your customer, including their transaction history. To view a customer record from the UI, follow these steps:
1. Locate the customer record and click the three-dot icon in the **Action** column.
2. Select **View Customer** from the menu to go to the customer's record.
From here, you can see whatever you need to know about this customer, including:
* Account information
* Payment history
* Active autopays and autopay history
* Invoice history, including past due invoices
* Saved payment methods
For a less detailed view, or to see a customer's information without leaving the *All Customers* screen, select **Quick View** instead of **View Customer** in step 2. This action opens the *Quick view* panel and displays payment history and basic account information.
## Edit a customer record
To edit a customer record from the UI, follow these steps:
1. From the *All Customers* screen, locate the customer record and click the three-dot icon in the **Action** column.
2. Select **Edit Customer** from the menu to open the *Edit customer* modal.
3. Here, you can edit the account information, billing details, shipping address, any custom fields you may be using.
4. When finished, save your changes.
## Create a payment
To create a payment from within a customer record in the UI, see [Create a one-time transaction from a customer record](/guides/pay-in-portal-transactions-create#create-a-one-time-payment-from-a-customer-record).
## Add a payment method
You can add a new payment method for a customer separately from creating a payment or autopay. To save a new payment method for a customer from the UI, follow these steps:
1. From the *All Customers* screen, locate the customer record and click the three-dot icon in the **Action** column.
2. Select **Add Payment Method** from the menu to open the customer's payment methods screen.
3. In the Payment Method modal, select the type of payment method and enter the details.
4. Click **+ Add a payment method.**
## Delete a customer
Deleting a customer is permanent and can't be undone.
To delete a customer record from the UI, follow these steps:
1. From the *All Customers* screen, locate the customer record and click the three-dot icon in the **Action** column.
2. Select **Delete Customer**.
3. In the confirmation modal that appears, click **Delete** if you are sure you want to permanently delete this customer.
## Download and upload customers
To download a list of all customers from the UI, click the **Download** icon on the *All Customers* screen.
Your download will begin automatically.
To upload a list of customers from the UI, follow these steps:
1. From the *All Customers* screen, click the **Upload** icon.
2. Follow the prompts to upload a CSV file.
Uploaded files must be in CSV format. To get a sample file in the format Payabli requires for importing, click **Download Sample Files (\*.csv)**.
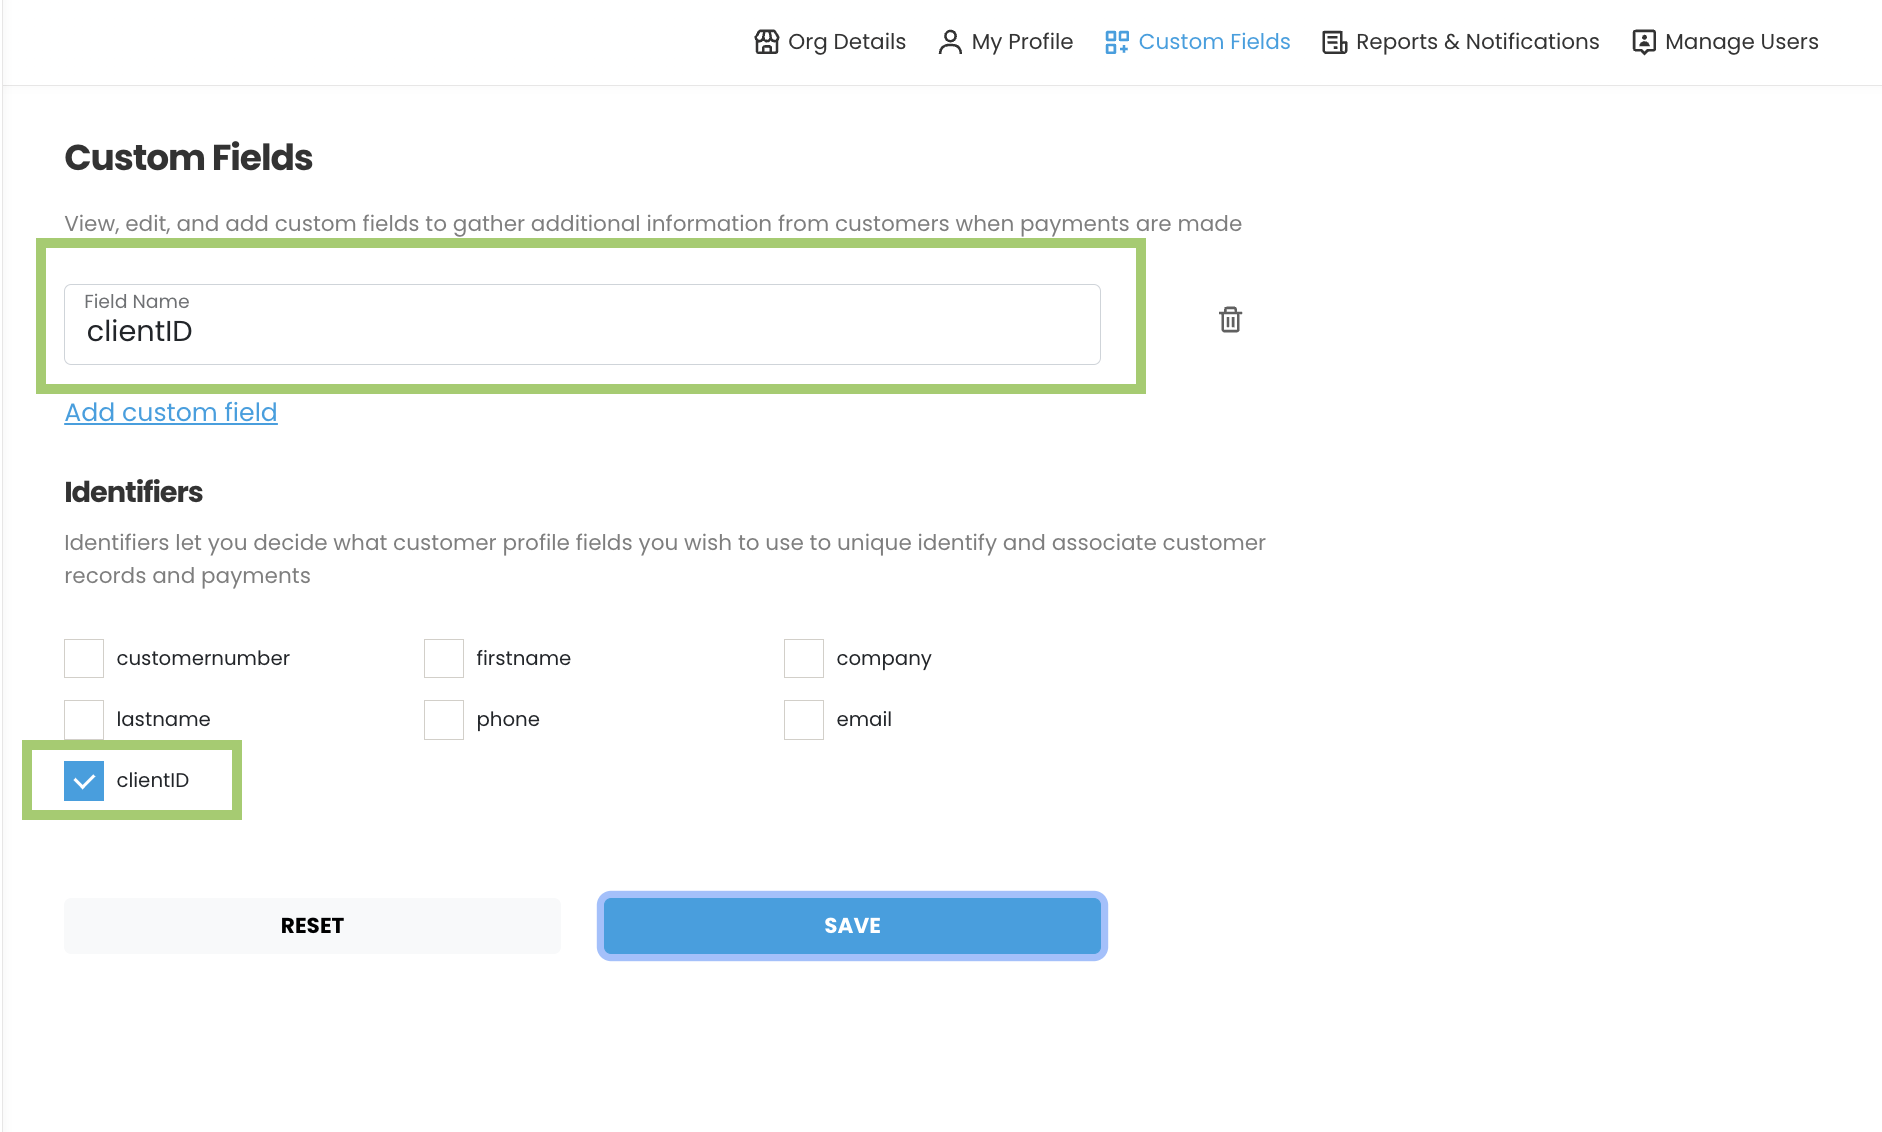
## Custom fields and identifiers
Custom fields let you create new fields to capture more information about your customers. Custom identifiers give you the flexibility to match customers in Payabli using the conventions you already use.
### Manage custom fields
To add a custom field in the UI:
1. Navigate to **Settings > Custom Fields**.
2. Click **Add custom field**.
3. Enter the field's name.
You can now use this field to capture additional information about your customers, or use the field as a custom identifier.
To delete a custom field, click trash icon.
### Custom identifiers
Payabli recommends using the system-generated `customerId` field to identify customers for ease of integration and consistency. However, you can configure custom identifiers, which lets you decide which customer profile fields to use to uniquely identify and associate customer records and payments.
Custom identifiers cascade from org parent to child entities, so you can set them at the organization level and have them apply to all child paypoints. This is useful if you want to use a specific field across all your customers, such as `email` or `clientId`.
For example. if your company uses the customer's email address as their unique identifier, you can choose `email` as the identifier. If your organization prefers to identify customers by a field called `clientId`, you can create that custom field in Payabli and set it as an identifier. This means that every API call that involves a customer must include the `clientID` because Payabli uses that field to search for customers.