# Manage Vendors in the UI
> Manage vendor relationships in PayHub for Pay Out transactions. Add vendors, process bills, configure payment methods, and track vendor payment history through the UI workflow
Vendors are the entities that provide goods or services to paypoints and organizations. They're who gets paid in money out (pay out) transactions. Before you can use vendors in bills and payouts, you must add them. This guide explains how to add and manage vendors using the Payabli UI.
Payabli supports payouts to US and Canadian vendors only. International vendors aren't supported, and as a best practice you should avoid adding them in Payabli.
To access the Vendors screen, navigate to **Money Out > Vendors**. This action opens the *All Vendors & Recipients* screen. This is where you can locate and edit information for any of your vendors, and see an up-to-date total count of all your vendors and recipients.
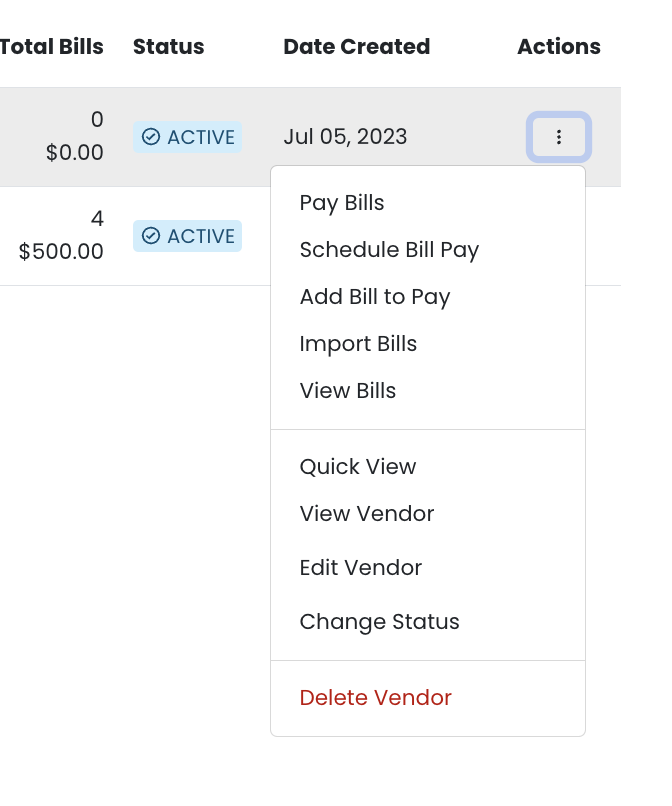
For each vendor record, you can:
* Pay bills
* Add a bill to pay
* Schedule a bill payment
* Import bills
* View bills for that vendor
* Quick view vendor details
* View vendor information
* Edit vendor information
* Change a vendor's status
* Delete a vendor
* Import an existing vendor list
* Download your vendor list
To see all options for managing an individual vendor, click the three-dot menu in the **Actions** column.
 ## View a vendor record
To view vendor's details in the UI, follow these steps:
1. From the *All Vendors & Recipients* screen, locate the vendor record and click the three-dot icon in the **Actions** column.
2. Select **View Vendor** from the menu to go to the vendor's dashboard.
3. From here, you can see:
* Account information
* Bills you've paid to this vendor
* Bills you've received from this vendor
* A visual summary of this vendor's billing volume (including active volume, past due volume, in transit volume, total volume, and paid volume)
For a less detailed view, or to see a vendor's information without leaving the *All Vendors & Recipients* screen:
1. Select **Quick View** instead of **View Vendor** in step 2.
2. This opens the *Quick view* panel and displays the volume summary, payment history, and account information, which you can edit here.
## Edit a vendor record
To edit a vendor's record, follow these steps:
1. From the *All Vendors & Recipients* screen, locate the vendor record you're interested in and click the three-dot icon in the **Actions** column.
2. Select **Edit Vendor** from the menu to open the *Edit vendor* modal.
3. Here, you can edit the account information, billing details, remit address, and any custom fields you may be using.
4. When you've made the changes you want, click **Save Vendor**.
## Pay a bill
To pay a specific bill to a vendor from the UI, follow these steps:
1. From the *All Vendors & Recipients* screen, locate the vendor record and click the three-dot icon in the **Actions** column.
2. Select **Pay Bill** from the menu to open the *All Bills* view for that vendor.
3. At the top are several quick-filter options: **Active**, **Sent to Approval**, **Approved**, **In Transit**, **Paid**, **Not Approved**, and **Deleted/Cancelled**. Each of these categories displays the number of transactions it includes, as well as the total value of those transactions.
4. If you want to implement a quick filter, click the option you're interested in. To remove the filter, click the **Reset** icon. Otherwise, continue to step 5.
5. Find the bill you want to pay and click the three-dot icon in the **Actions** column. Then select **Pay Bill** from the menu.
6. In the *Pay Bill* panel, fill in the details and select your preferred payment delivery method, either **Send vendor payment link** or **Select how vendor gets paid**. If you choose the latter, specify the payment method from the options listed.
7. Click **Send Payment Link** or **Send Payment** (the text will depend on your choice in step 6 above) to pay the bill.
To run a more detailed filter, click the **Filter** icon. See this Help Center article for details.
## Add a bill to a vendor
To add a bill to a vendor's record from the UI, follow these steps:
1. From the *All Vendors & Recipients* screen, locate the vendor record and click the three-dot icon in the **Actions** column.
2. Select **Add Bill to Pay** from the menu to open the *Add Bill* view.
3. Enter the bill's details and select your preferred payment delivery method, either **Send vendor payment link** or **Select how vendor gets paid**. If you choose the latter, specify the payment method from the options listed.
4. Click **Send Payment Link** or **Send Payment** (the text will depend on your choice in step 3) to pay the bill, or click **Save Bill** to save the bill and complete it later.
## Change a vendor status
To change a vendor's status from the UI, follow these steps:
1. From the *All Vendors & Recipients* screen, locate the vendor record and click the three-dot icon in the **Actions** column.
2. Select **Change Status** from the menu.
3. In the *Change Status* modal, set the vendor's status to either **Active** or **Inactive**.
4. Click **Save**.
## Delete a vendor
Deleting a vendor is permanent and can't be undone.
To delete a vendor record from Payabli via the UI, follow these steps:
1. From the *All Vendors & Recipients* screen, locate the vendor record and click the three-dot icon in the **Actions** column.
2. Select **Delete Vendor** from the menu.
3. In the confirmation modal that appears, click **Delete** if you are sure you want to permanently delete this vendor.
## Import an existing vendor list
To import a vendor list into Payabli via the UI, follow these steps:
1. From the *All Vendors & Recipients* screen, click the **Import** icon.
2. Drag the appropriate file into the modal that opens.
3. Click **Save Upload**.
Your list must be in CSV format. You can download a sample CSV file to ensure yours is formatted correctly by clicking **Download Sample Files (\*.csv)**.
## Export your vendor list
To download your vendor list from Payabli via the UI, follow these steps:
1. From the *All Vendors & Recipients* screen, click the **Download** icon.
2. Select **.XLSX** or **.CSV** format.
The download will begin automatically.
## View a vendor record
To view vendor's details in the UI, follow these steps:
1. From the *All Vendors & Recipients* screen, locate the vendor record and click the three-dot icon in the **Actions** column.
2. Select **View Vendor** from the menu to go to the vendor's dashboard.
3. From here, you can see:
* Account information
* Bills you've paid to this vendor
* Bills you've received from this vendor
* A visual summary of this vendor's billing volume (including active volume, past due volume, in transit volume, total volume, and paid volume)
For a less detailed view, or to see a vendor's information without leaving the *All Vendors & Recipients* screen:
1. Select **Quick View** instead of **View Vendor** in step 2.
2. This opens the *Quick view* panel and displays the volume summary, payment history, and account information, which you can edit here.
## Edit a vendor record
To edit a vendor's record, follow these steps:
1. From the *All Vendors & Recipients* screen, locate the vendor record you're interested in and click the three-dot icon in the **Actions** column.
2. Select **Edit Vendor** from the menu to open the *Edit vendor* modal.
3. Here, you can edit the account information, billing details, remit address, and any custom fields you may be using.
4. When you've made the changes you want, click **Save Vendor**.
## Pay a bill
To pay a specific bill to a vendor from the UI, follow these steps:
1. From the *All Vendors & Recipients* screen, locate the vendor record and click the three-dot icon in the **Actions** column.
2. Select **Pay Bill** from the menu to open the *All Bills* view for that vendor.
3. At the top are several quick-filter options: **Active**, **Sent to Approval**, **Approved**, **In Transit**, **Paid**, **Not Approved**, and **Deleted/Cancelled**. Each of these categories displays the number of transactions it includes, as well as the total value of those transactions.
4. If you want to implement a quick filter, click the option you're interested in. To remove the filter, click the **Reset** icon. Otherwise, continue to step 5.
5. Find the bill you want to pay and click the three-dot icon in the **Actions** column. Then select **Pay Bill** from the menu.
6. In the *Pay Bill* panel, fill in the details and select your preferred payment delivery method, either **Send vendor payment link** or **Select how vendor gets paid**. If you choose the latter, specify the payment method from the options listed.
7. Click **Send Payment Link** or **Send Payment** (the text will depend on your choice in step 6 above) to pay the bill.
To run a more detailed filter, click the **Filter** icon. See this Help Center article for details.
## Add a bill to a vendor
To add a bill to a vendor's record from the UI, follow these steps:
1. From the *All Vendors & Recipients* screen, locate the vendor record and click the three-dot icon in the **Actions** column.
2. Select **Add Bill to Pay** from the menu to open the *Add Bill* view.
3. Enter the bill's details and select your preferred payment delivery method, either **Send vendor payment link** or **Select how vendor gets paid**. If you choose the latter, specify the payment method from the options listed.
4. Click **Send Payment Link** or **Send Payment** (the text will depend on your choice in step 3) to pay the bill, or click **Save Bill** to save the bill and complete it later.
## Change a vendor status
To change a vendor's status from the UI, follow these steps:
1. From the *All Vendors & Recipients* screen, locate the vendor record and click the three-dot icon in the **Actions** column.
2. Select **Change Status** from the menu.
3. In the *Change Status* modal, set the vendor's status to either **Active** or **Inactive**.
4. Click **Save**.
## Delete a vendor
Deleting a vendor is permanent and can't be undone.
To delete a vendor record from Payabli via the UI, follow these steps:
1. From the *All Vendors & Recipients* screen, locate the vendor record and click the three-dot icon in the **Actions** column.
2. Select **Delete Vendor** from the menu.
3. In the confirmation modal that appears, click **Delete** if you are sure you want to permanently delete this vendor.
## Import an existing vendor list
To import a vendor list into Payabli via the UI, follow these steps:
1. From the *All Vendors & Recipients* screen, click the **Import** icon.
2. Drag the appropriate file into the modal that opens.
3. Click **Save Upload**.
Your list must be in CSV format. You can download a sample CSV file to ensure yours is formatted correctly by clicking **Download Sample Files (\*.csv)**.
## Export your vendor list
To download your vendor list from Payabli via the UI, follow these steps:
1. From the *All Vendors & Recipients* screen, click the **Download** icon.
2. Select **.XLSX** or **.CSV** format.
The download will begin automatically.