ExpressCheckout UI
The ExpressCheckout component lets you embed an express checkout for digital wallets inside your website or application. This component provides seamless integration with Apple Pay and Google Pay.
Usage
This component lets you add a robust low-code way to accept payments from digital wallets (Apple Pay and Google Pay) to your pages or apps with automatic device compatibility detection. Follow the configuration walkthrough to set it up in your project.
See Library URLs for important information about embedded components library URLs.
Configuration walkthrough
The interactive walkthrough displays code examples alongside step-by-step explanations.
Select a tab to see the walkthrough for your desired use case.
Process a payment
Create a subscription
Tokenize a payment method
Process and tokenize
/// Include the Payabli script
First, add the Payabli embedded component script to your HTML.
Make sure to include the data-test attribute for testing in the sandbox environment.
Including <meta charset="UTF-8"> in the <head> element prevents problems with special characters such as ‘á’ or ‘ñ’.
/// Create the container
Add a container element where the embedded component renders. The configuration references this element by its id attribute.
This <div> element serves as the mounting point where the embedded component renders.
/// Configure the component
Create the configuration object that defines how your embedded component behaves. This configuration includes authentication tokens, payment method settings, and callback functions.
The rootContainer property connects the component to your HTML element by matching the id attribute value. The token value must be a public API token.
See the Configuration Reference for more information.
/// Add callback functions
Implement success, error, ready, and cancel callback functions to handle component responses and form validation states. These callback functions execute after the user interacts with the digital wallet buttons and the component receives a response from Payabli’s API. /// Initialize the component
The final step creates a working express checkout that can process transactions with digital wallets.
/// Include the Payabli script
First, add the Payabli embedded component script to your HTML.
Make sure to include the data-test attribute for testing in the sandbox environment.
Including <meta charset="UTF-8"> in the <head> element prevents problems with special characters such as ‘á’ or ‘ñ’.
/// Create the container
Add a container element where the embedded component renders. The configuration references this element by its id attribute.
This <div> element serves as the mounting point where the embedded component renders.
/// Configure the component
Create the configuration object that defines how your embedded component behaves. This configuration includes authentication tokens, payment method settings, and callback functions.
The rootContainer property connects the component to your HTML element by matching the id attribute value. The token value must be a public API token.
See the Configuration Reference for more information.
/// Configure autopay
Set mode to "autopay" inside the expressCheckout object to enable recurring transactions.
Include the autopay object to define the billing schedule.
The frequency and startDate fields are required.
Set untilCancel to true to continue billing until the customer cancels the subscription, or set an endDate value to automatically stop billing after a certain date.
/// Add callback functions
Implement success, error, ready, and cancel callback functions to handle component responses.
When mode is "autopay", the success callback indicates that a recurring subscription has been created. The flow field in the response will be "autopay".
/// Initialize the component
The final step creates a working express checkout that sets up recurring autopay subscriptions using digital wallets.
/// Include the Payabli script
First, add the Payabli embedded component script to your HTML.
Make sure to include the data-test attribute for testing in the sandbox environment.
Including <meta charset="UTF-8"> in the <head> element prevents problems with special characters such as ‘á’ or ‘ñ’.
/// Create the container
Add a container element where the embedded component renders. The configuration references this element by its id attribute.
This <div> element serves as the mounting point where the embedded component renders.
/// Configure the component
Create the configuration object that defines how your embedded component behaves. This configuration includes authentication tokens, payment method settings, and callback functions.
The rootContainer property connects the component to your HTML element by matching the id attribute value. The token value must be a public API token.
See the Configuration Reference for more information.
/// Configure tokenization
Set mode to "tokenization" inside the expressCheckout object to save the customer’s payment method without charging it.
Optionally, set fallbackAuthAmount to specify an authorization amount for validating the method, and methodDescription to save the payment method with a label.
When mode is set to tokenization, the amount and fee fields are required but ignored by the component.
/// Add callback functions
Implement success, error, ready, and cancel callback functions to handle component responses.
When mode is "tokenization", no charge is made. The success callback indicates that the payment method has been saved. Use responseData.methodReferenceId to retrieve the stored method’s token for future use. The flow field in the response will be "tokenization".
/// Initialize the component
The final step creates a working express checkout that tokenizes digital wallet payment methods for future use without charging the customer.
/// Include the Payabli script
First, add the Payabli embedded component script to your HTML.
Make sure to include the data-test attribute for testing in the sandbox environment.
Including <meta charset="UTF-8"> in the <head> element prevents problems with special characters such as ‘á’ or ‘ñ’.
/// Create the container
Add a container element where the embedded component renders. The configuration references this element by its id attribute.
This <div> element serves as the mounting point where the embedded component renders.
/// Configure the component
Create the configuration object that defines how your embedded component behaves. This configuration includes authentication tokens, payment method settings, and callback functions.
The rootContainer property connects the component to your HTML element by matching the id attribute value. The token value must be a public API token.
See the Configuration Reference for more information.
/// Enable payment method tokenization
To enable payment method tokenization, add the saveIfSuccess field to your configuration and set its value to true.
After a successful transaction, the component saves the payment method for future use.
You can access the tokenized payment method in the response object’s data.methodReferenceId field.
/// Add callback functions
Implement success, error, ready, and cancel callback functions to handle component responses and form validation states. These callback functions execute after the user interacts with the digital wallet buttons and the component receives a response from Payabli’s API. /// Initialize the component
The final step creates a working express checkout that can process transactions with digital wallets.
Use cases
The ExpressCheckout component has four use cases:
- process a payment
- create a subscription
- tokenize a payment method
- process a payment and tokenize the payment method
The use case of the component is determined by the value of the mode field in the expressCheckout configuration object.
If the mode field isn’t defined, the component defaults to processing one-time payments.
Process a payment
In this use case, the ExpressCheckout component processes a one-time transaction for a specified amount.
This is the most common use case for the ExpressCheckout component.
To enable this use case, set the mode field to one_time or leave it empty.
Create a subscription
In this use case, the ExpressCheckout component sets up a recurring subscription with a billing schedule.
The component then makes a $0.01 authorization to verify the customer’s payment method and then voids the authorization.
The billing schedule is determined by the frequency, startDate, and endDate fields in the autopay configuration object.
To enable this use case, set the mode field to autopay and define an autopay configuration object.
Tokenize a payment method
In this use case, the ExpressCheckout component tokenizes the customer’s payment method without processing a transaction.
The component then makes a $0.01 authorization to verify the customer’s payment method and then voids the authorization.
The tokenized payment method can be used for future transactions.
To enable this use case, set the mode field to tokenization.
Process and tokenize
In this use case, the ExpressCheckout component processes a one-time transaction and also tokenizes the customer’s payment method for future use.
To enable this use case, set the mode field to one_time and set the saveIfSuccess field to true.
Configuration reference
These are the configuration parameters available for the ExpressCheckout component.
This value determines the type of embedded component to render.
Accepted values are: methodEmbedded, methodLightbox, vterminal, or expressCheckout.
For the ExpressCheckout UI, this value is expressCheckout.
See the Embedded Components Overview for more information on other component types.
Container ID used for the component.
When true, transactionDetails object is returned in the response. See a full example of the transactionDetails object in the Transaction integration guide.
This field only applies when the mode field is set to one_time or not provided.
If the mode field is set to tokenization or autopay, this field is ignored.
API token for authentication. This should be a public API token, as described here.
When the API token belongs to an organization, the entrypoint name identifies the target paypoint (merchant).
Complete URL of a custom CSS stylesheet to use with the component.
Configuration for the express checkout functionality.
properties
The use case that the component performs. Accepted values are:
one_time- The component processes a one-time transactionautopay- The component sets up a recurring subscription with a billing scheduletokenization- The component tokenizes the customer’s payment method
The amount for the transaction.
If the mode field is set to tokenization, this field is required but ignored by the component.
The fee for the transaction.
If the mode field is set to tokenization, this field is required but ignored by the component.
When true, if the transaction is successful, the payment method is tokenized and returned in the response.
Unlike mode: tokenization, which only tokenizes the payment method, this field processes the transaction and tokenizes the payment method.
This field only applies when the mode field is set to one_time.
If the mode field is set to tokenization or autopay, this field is ignored.
Invoice data to associate with the transaction.
When the mode field is set to one_time or autopay, a successful transaction creates an invoice with the provided data.
This field is ignored when mode is set to tokenization.
properties
Invoice number. Identifies the invoice under a paypoint.
Invoice date in any of the accepted formats: YYYY-MM-DD, MM/DD/YYYY.
Invoice due date in any of the accepted formats: YYYY-MM-DD, MM/DD/YYYY.
End date for a scheduled invoice cycle when invoiceType is 1. Accepted formats: YYYY-MM-DD or MM/DD/YYYY.
Invoice type. Value 0 is for single/one-time invoices, 1 for scheduled invoices.
Invoice status code.
Frequency of scheduled invoice. Accepted values are:
onetimeweeklyevery2weeksmonthlyevery3monthsevery6monthsannually
Payment terms for the invoice. If no terms are defined, defaults to NET30. Accepted values are:
PIA,CIA,URNET10,NET20,NET30,NET45,NET60,NET90EOM,MFI,5MFI,10MFI,15MFI,20MFI2/10NET30UF,10UF,20UF,25UF,50UF
Custom terms and conditions included in the invoice.
Notes included in the invoice.
Purchase order number.
First name of the recipient of the invoice.
Last name of the recipient of the invoice.
Company name of the recipient of the invoice.
The shipping address.
Additional line for shipping address.
Shipping city.
Shipping state or province.
Shipping ZIP code. Supports 5-digit and 9-digit ZIP codes and alphanumeric Canadian postal codes. For example: 37615-1234 or 37615.
Shipping address country.
Shipping recipient’s contact email address.
Recipient phone number.
Sender shipping ZIP code.
Commodity code.
The invoice amount.
Tax rate in percent applied to the invoice.
Discount applied to the invoice.
Freight/shipping amount.
Duty amount.
Array of line items included in the invoice.
properties
Item or product code. Max length of 250 characters.
Item or product name. Max length of 250 characters.
Item or product description. Max length of 250 characters.
Item or product commodity code. Max length of 250 characters.
Internal class of item or product. Value 0 is only for invoices, 1 for bills, and 2 is common for both. Required on invoice line items — invoice creation fails with Invalid item data if it’s omitted.
Quantity of item or product.
Item or product price per unit.
Per-line total for this item (unit cost times quantity). Required on invoice line items.
Tax rate applied to item or product.
Tax amount applied to item or product.
Unit of measurement. Max length of 100 characters.
Array of tags classifying item or product.
Array of file objects with attached documents. Max upload size is 30 MB.
properties
The name of the attached file.
File type. Accepted values are: pdf, doc, docx, jpg, jpeg, png, gif, txt.
Content of file, Base64-encoded. Ignored if furl is specified. Max upload size is 30 MB.
Optional URL to show or download the file remotely.
Custom dictionary of key-value pairs. Use this field to store any data related to the object or for your system.
Split funding instructions for the transaction. The total amount of the splits must match the total amount of the transaction. See Split a Transaction for more.
properties
The accountId for the account the split should be sent to.
Amount from the transaction to send to this recipient.
A description for the split.
The entrypoint the split should be sent to.
The currency for the transaction.
Define the number of columns to use for digital wallet display.
Card networks to accept payments from. Suggested options:
amexvisadiscovermasterCardjcb
Configuration for recurring transactions.
This object is required when the mode field is set to autopay.
properties
The frequency of the recurring transaction. Accepted values are:
onetimeweeklyevery2weeksmonthlyevery3monthsevery6monthsannually
The start date for the recurring transaction in ISO 8601 format (example: "2026-06-20").
Must be a future date.
The end date for the recurring transaction in ISO 8601 format (example: "2027-12-20").
Must be later than the value of the startDate field.
If not provided, the recurring transaction continues indefinitely until cancelled.
When true, the recurring transaction continues indefinitely until cancelled.
If endDate is also provided, the recurring transaction continues until the end date is reached or the transaction is cancelled.
Amount to use for authorization when the mode field is set to tokenization.
Partner-facing label for the payment method tokenized by the ExpressCheckout component when the mode field is set to tokenization.
properties
When true, Apple Pay is enabled.
The Apple Pay button style. Supported options:
- “black”: Default black button.
- “white-outline”: White button with an outline.
- “white”: Solid white button.
The text on Apple Pay button. Supported options:
The Apple Pay button locale. Supported options:
- en-US: English (US)
- ar-AB: Arabic
- ca-ES: Catalan
- zh-CN: Chinese (China)
- zh-HK: Chinese (Hong Kong)
- zh-TW: Chinese (Taiwan)
- hr-HR: Croatian
- cs-CZ: Czech
- da-DK: Danish
- de-DE: German
- nl-NL: Dutch
- en-AU: English (Australia)
- en-GB: English (UK)
- fi-FI: Finnish
- fr-CA: French (Canada)
- fr-FR: French (France)
- el-GR: Greek
- he-IL: Hebrew
- hi-IN: Hindi
- hu-HU: Hungarian
- id-ID: Indonesian
- it-IT: Italian
- ja-JP: Japanese
- ko-KR: Korean
- ms-MY: Malay
- nb-NO: Norwegian
- pl-PL: Polish
- pt-BR: Portuguese (Brazil)
- pt-PT: Portuguese (Portugal)
- ro-RO: Romanian
- ru-RU: Russian
- sk-SK: Slovak
- es-MX: Spanish (Mexico)
- es-ES: Spanish (Spain)
- sv-SE: Swedish
- th-TH: Thai
- tr-TR: Turkish
- uk-UA: Ukrainian
- vi-VN: Vietnamese
When true, Apple Pay is available in third-party browsers (Chrome, Edge, and Firefox) through a QR code flow.
When false (default), Apple Pay is limited to Safari only.
See Apple Pay compatibility for more information.
properties
When true, Google Pay is enabled.
The Google Pay button style. Supported options:
- “black”: Solid black button.
- “white”: Solid white button.
- “default”: Falls back to the default black button.
The text on Google Pay button. Supported options:
The Google Pay button locale. Supported options:
- en: English
- ar: Arabic
- bg: Bulgarian
- ca: Catalan
- cs: Czech
- da: Danish
- de: German
- el: Greek
- es: Spanish
- et: Estonian
- fi: Finnish
- fr: French
- hr: Croatian
- id: Indonesian
- it: Italian
- ja: Japanese
- ko: Korean
- ms: Malay
- nl: Dutch
- no: Norwegian
- pl: Polish
- pt: Portuguese
- ru: Russian
- sk: Slovak
- sl: Slovenian
- sr: Serbian
- sv: Swedish
- th: Thai
- tr: Turkish
- uk: Ukrainian
- zh: Chinese
When this field is true, the following fields ["postalAddress", "name", "phoneticName", "phone", "email"] are required. They are sent with the payment and can be read through the callbacks.
properties
Height of the button.
Border radius of the button.
properties
Horizontal padding.
Vertical padding.
properties
Customer’s identification number.
Customer’s first name.
Customer’s last name.
Customer’s billing email address.
Triggered when the ExpressCheckout component is ready to use.
Triggered upon successful completion of a digital wallet transaction.
Triggered if an error occurs during the digital wallet transaction.
Triggered if the user cancels the digital wallet transaction.
Response
The ExpressCheckout component uses callback functions to handle responses. The callback functions are triggered based on the component’s state. There are four callback functions you can define in the configuration:
functionCallBackReady: Triggered when the component is ready to use.functionCallBackSuccess: Triggered when a transaction is successfully completed.functionCallBackError: Triggered if an error occurs during the transaction.functionCallBackCancel: Triggered if the user cancels the transaction.
Each callback function receives a different response object that contains information about the component’s state.
functionCallbackReady response
The functionCallbackReady response is triggered when the component is ready to use.
When true, the component is ready to accept Apple Pay.
When true, the component is ready to accept Google Pay.
functionCallbackSuccess response
The functionCallBackSuccess response is triggered when a use case is successfully completed with the ExpressCheckout component.
The shape of the response object varies based on the use case selected by the mode field.
The data sub-object of the response contains the response from an API endpoint called by the ExpressCheckout component.
See the following table for which endpoint is called based on the mode field:
For one-time payments, the referenceId field of the response object is the transaction ID.
If the saveIfSuccess field is set to true, the methodReferenceId field contains the stored payment method’s ID.
For tokenization, the referenceId field of the response object is the stored payment method’s ID.
For autopay, the responseData field of the response object is the subscription ID.
Container for response data. The shape of this object varies based on the use case of the component.
This object contains the response from one of the following API endpoints based on the value of the mode field:
one_timeor empty: /MoneyIn/getpaidautopay: /Subscription/addtokenization: /TokenStorage/add
See the API reference for each endpoint for more information about the shape of the response data.
The payment method used. Possible values include "apple_pay" and "google_pay".
The use case that the component performed.
This field’s value is equal to the mode field in the component configuration.
Possible values are:
one_timeautopaytokenization
functionCallBackError response
This response is triggered if an error occurs during the transaction.
The payment method used. Possible values include "apple_pay" or "google_pay".
The use case that the component attempted to perform when the error occurred.
This field’s value is equal to the mode field in the component configuration.
Possible values are:
one_timeautopaytokenization
Container for error details when an error occurs.
properties
Indicates whether the operation was successful. In error cases, this is false.
Auxiliary validation used by Payabli in payment pages and components.
The error code. For example, 5005. See API responseCode and resultCode Reference for a full list of error codes.
Additional details about the error.
properties
A detailed explanation of the error.
Suggested action to resolve the error.
A brief description of the error.
Internal field used by Payabli.
functionCallBackCancel response
This response is triggered if the user cancels the transaction while the modal is visible.
Container for response data.
properties
In this field, true indicates that the event was triggered by a user action, such as a user manually canceling the payment process.
The digital wallet method used.
Apple Pay compatibility
The ExpressCheckout component supports Apple Pay in Safari and in third-party browsers. This section covers the behavior of Apple Pay in third-party browsers and the requirements for enabling it.
Behavior
The behavior of the Apple Pay button depends on the user’s browser:
- On Safari (after version 17 on iOS), clicking the Apple Pay button opens the Apple Pay modal. The modal prompts the user to complete the payment. Safari versions 17 and earlier on iOS don’t support Apple Pay.
- On third-party browsers (Chrome, Edge, and Firefox), clicking the Apple Pay button opens a modal with a QR code. The user scans the QR code with an Apple device running iOS 18 or later to complete the payment.
Requirements
To use Apple Pay in third-party browsers, you must meet the following requirements:
- The
crossBrowserfield must be set totruein the component’sapplePayconfiguration object - Your site’s domain must be verified with Apple Pay
- Your site’s Content Security Policy (CSP) must allow the Apple Pay SDK script to load on your site
Read the sections below to learn more about domain verification and CSP requirements.
Domain verification
To use Apple Pay in third-party browsers, you must verify your site’s domain with Apple Pay.
If you set the applePay config object’s crossBrowser field to true and your site’s domain isn’t verified, the Apple Pay button isn’t displayed on any browsers.
Leave crossBrowser set to false (default) until your domain is verified, to keep Apple Pay working in Safari only.
You can verify your domain by making a POST request to the /PaymentMethodDomain endpoint. To learn more about verifying domains for Apple Pay, see Activate Apple Pay.
Content Security Policy (CSP)
The ExpressCheckout component loads the Apple Pay SDK script via a <script> tag and can affect your site’s Content Security Policy (CSP).
The way that the Apple Pay SDK script is loaded depends on the value of the crossBrowser field in the applePay configuration object:
- When the
crossBrowserfield is set totrue, the ExpressCheckout component loads the Apple Pay SDK script at the top level of your page so the QR code flow can work in third-party browsers. - When the
crossBrowserfield is set tofalse(default) or empty, the ExpressCheckout component loads the Apple Pay SDK script inside of its own<iframe>and only works on Safari.
If you set crossBrowser to true and your app runs in a strict CSP environment, the ExpressCheckout component is unable to load the Apple Pay SDK script in your site’s <head>.
The ExpressCheckout component falls back to loading the Apple Pay SDK script inside of its own <iframe>, which allows the Apple Pay button to work in Safari but not in third-party browsers.
To enable cross-browser payments with Apple Pay, add this host to your script-src directive: https://applepay.cdn-apple.com.
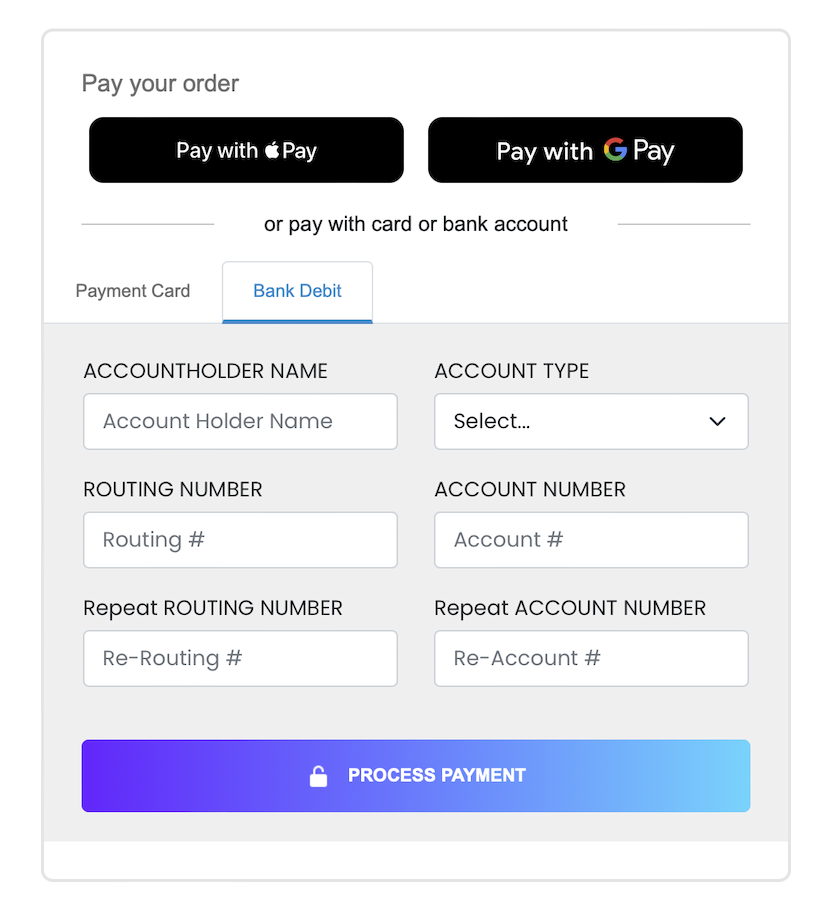
Combine components
If you want to accept digital wallet payments along with card or ACH payments, you can load both the EmbeddedMethod UI and ExpressCheckout UI components on the same webpage. You can also use updateConfig to switch between component configurations on your page.
The code example renders the components in this image:
Combine components walkthrough
The interactive walkthrough displays code examples alongside step-by-step explanations.
/// Include the Payabli script
First, add the Payabli embedded component script to your HTML.
Make sure to include the data-test attribute for testing in the sandbox environment.
Including <meta charset="UTF-8"> in the <head> element prevents problems with special characters such as ‘á’ or ‘ñ’.
/// Create the page structure
Add a container for the ExpressCheckout component, wrapped in a hidden div that the component reveals once it’s ready.
Below that, add button-based tabs so you can switch between card and ACH, and a shared container for the EmbeddedMethod component.
/// Add styles
Add CSS for the hidden class, the “or pay with” divider, the tab bar, and the payment button.
/// Configure the card component
Create the configuration object for the EmbeddedMethod card component.
The rootContainer value must match the id of the container div. The token value must be a public API token.
Setting defaultOpen: "card" makes the card form the default view.
/// Configure the ACH component
Create a second EmbeddedMethod configuration for ACH payments.
Both card and ACH configs share the same rootContainer — updateConfig swaps between them when the user switches tabs.
Setting defaultOpen: "ach" pre-selects the bank account form when this config is active.
/// Configure the ExpressCheckout component
Create the configuration object for the ExpressCheckout component.
The rootContainer value references the inner container div, not the outer hidden wrapper.
The functionCallBackReady callback removes the hidden class from containerExpressCheckout once the component confirms that at least one digital wallet is available on the device.
/// Initialize components and wire up tabs
Instantiate both components, then wire up the tab buttons.
Clicking a tab updates the active style and calls updateConfig to swap the EmbeddedMethod component between card and ACH mode without reinitializing.
The payment button calls payabliExec("pay") with the transaction details.
Related resources
See these related resources to help you get the most out of Payabli.
Prerequisites
- Apple Pay overview - You must have at least one wallet service implemented before using Express Checkout
- Google Pay™ overview - You must have at least one wallet service implemented before using Express Checkout