

Manage vendor links (Portal)
Send a vendor link instead of collecting their payout details yourself. The vendor picks how they want to get paid on a secure, hosted page, and Payabli automatically processes the payment once they confirm. This removes the back-and-forth of gathering vendor payment details for every bill, and Payabli stores the vendor’s choice for future payouts.
Payment links also exist for Pay In, where they let customers pay an invoice. Pay In payment links are directly associated with invoices and don’t have a separate report. This guide covers Pay Out vendor links only. For the Pay In equivalent, see Manage payment links (API). For information about invoices, see Manage invoices (UI).
Send a vendor link
You send a vendor link as part of creating a bill, not as a standalone action. When you fill out a bill, choose Send Vendor Link as the payment delivery method. For the full bill creation walkthrough, including where the vendor link option fits among the other ways to pay a bill, see Create a bill (Portal).
Which payment methods you can offer a vendor — such as ACH, virtual card, or check — depends on how the paypoint is configured. For the full set of configuration options (branding, messaging, default method, allowing multiple methods), see Manage vendor payment links (API).
Once the vendor opens the link and submits their choice, Payabli automatically processes the payment for that bill — you don’t take any further action.
If a vendor needs to provide different ACH details after receiving a vendor link, they can update them from the link itself, with no action needed from you. The vendor must complete an email authentication step before they can enter new account information. If Payabli’s automated verification can’t confirm the new account, Payabli offers the vendor microdeposit verification instead of a generic error — see Verify bank accounts with microdeposits.
Track vendor links
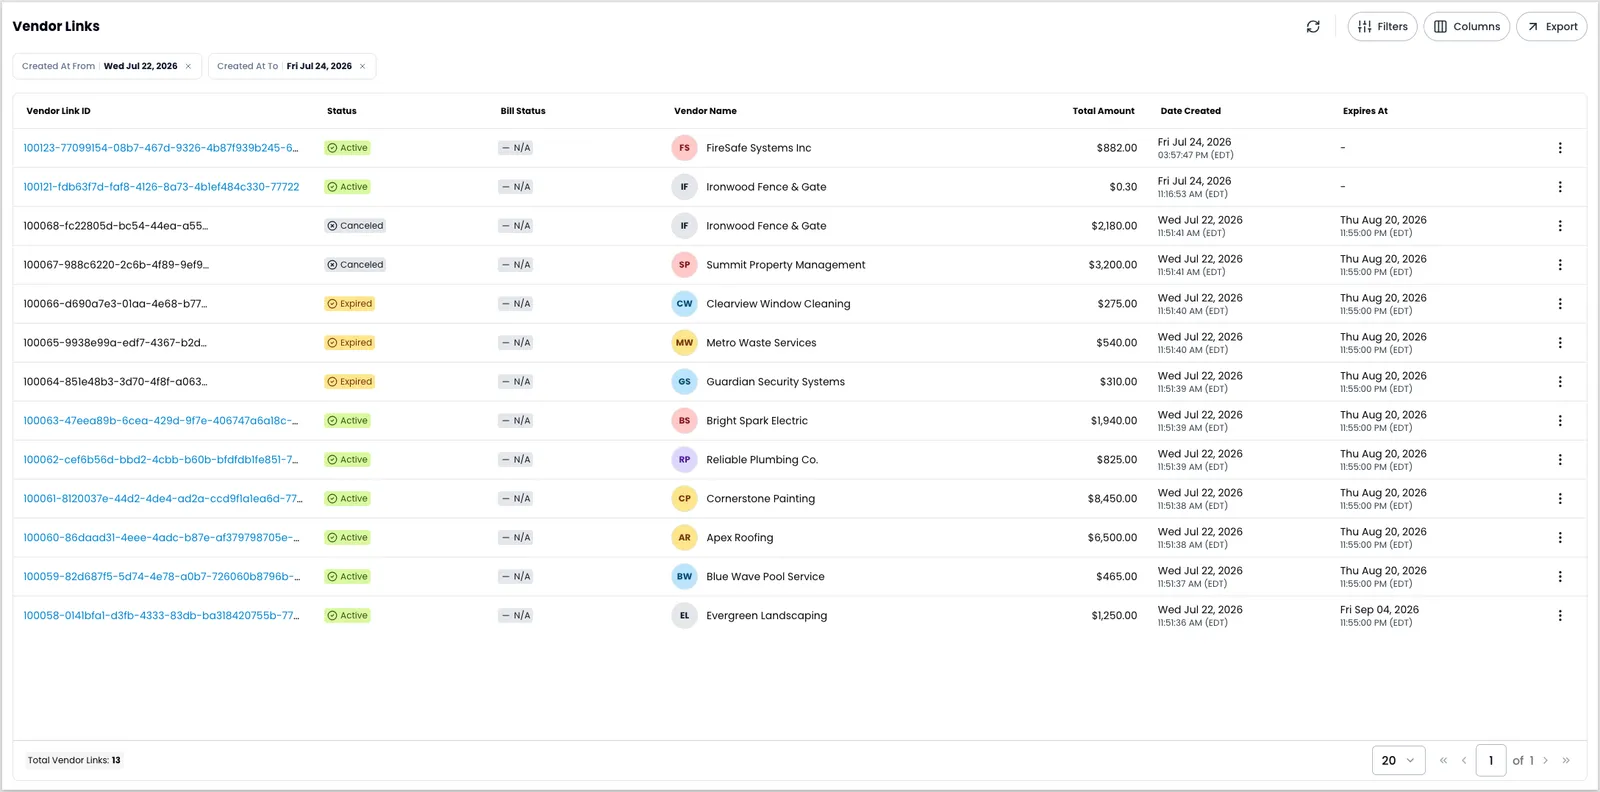
Go to Pay Out > Reports > Vendor Links for a report of every link you’ve sent and its current status. From the report you can:
- Filter and search to find a specific link or narrow the report by column.
- Export the report to CSV or XLSX for reconciliation or record-keeping. See Export the report.
- Open a link to view the payment form the vendor sees, or view its details to open the detail panel described in View a vendor link’s details.
Vendor link statuses
Each link in the report has one of these statuses:
- Active — sent to the vendor and still usable.
- Expired — past its expiration date. This happens automatically; you don’t need to expire a link yourself.
- Canceled — manually canceled before the vendor completed it.
Links deleted through the API show as Deleted. There’s no delete action in the portal — see Delete payment link in the API reference.
These statuses describe the link, not the payment. To confirm whether a vendor was paid, check the link’s Bill Status. It appears both as a column in the Vendor Links report and in the Bills section of the link’s detail panel (three-dot menu > View Details). For what each bill status means, see Bill statuses.
For example, a link for a partially paid bill stays Active, and you can still resend or cancel it. The vendor can’t use it: opening the link will show that the bill is paid. See Partially paid bills.
Export the report
To export the Vendor Links report to a file:
- Go to Pay Out > Reports > Vendor Links.
- Click Export, then select the columns to include in the file.
- Click Export as CSV or Export as XLSX.
View a vendor link’s details
To open a link’s detail panel, find it in the Vendor Links report, click its three-dot menu, and select View Details.
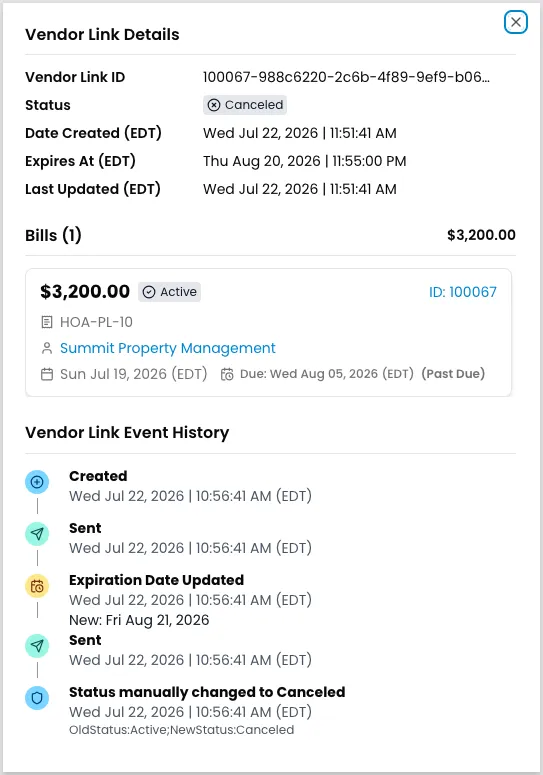
The detail panel gathers everything about the link in one place:
- Header details — the vendor link ID, current status, when it was created, when it expires, and when it was last updated.
- Paypoint & Organization — the paypoint and organization the link belongs to (shown when viewing across paypoints), including the paypoint’s entry name, DBA name, legal name, and external paypoint ID.
- Bills — the bill tied to the link, including its amount, bill status, vendor, and due date.
- Vendor Link Event History — a timeline showing when the link was created, sent, resent, or opened. It also shows each expiration change, including old and new dates.
Use the event history to troubleshoot — for example, to confirm whether a vendor opened the link before it expired, or to see how many times it’s been resent.
Resend a vendor link
Resend a link if the vendor lost the original email or never received it. To do this, complete the following steps:
- Go to Pay Out > Reports > Vendor Links.
- Find the vendor link you want to send to the vendor, and click the three-dot menu, then click Resend Vendor Link.
- Enter any additional email addresses you want to send the vendor link to, and click the plus icon to add them to the recipients.
- Click Accept.
Payabli sends the vendor link to all listed recipients.
Reactivate an expired link
Reactivate a link with the Expired status to make it usable again. To do this, complete the following steps:
- Go to Pay Out > Reports > Vendor Links.
- Find the vendor link you want to reactivate, and click the three-dot menu, then click Reactivate Vendor Link.
- Set a new expiration date.
- Click Reactivate.
The link returns to the Active status.
This doesn’t trigger a notification — you’ll need to notify the vendor that the link is available again.
Cancel a vendor link
Cancel a link with the Active status so the vendor can no longer use it. To do this, complete the following steps:
- Go to Pay Out > Reports > Vendor Links.
- Find the vendor link you want to cancel, and click the three-dot menu, then click Cancel Vendor Link.
- Click Accept to confirm.
The link moves to the Canceled status.
A canceled vendor link can’t be reactivated. If the vendor still needs to be paid, send a new link.
Resending, reactivating, and canceling links require the vendor link update permission for your role.
Related resources
See these related resources to help you get the most out of Payabli.
Prerequisites
- Create a bill (Portal) - You send a vendor link as part of creating a bill.
References
- Pay Out statuses - Learn about Pay Out statuses
Often confused with
Manage Payment Links - Pay In payment links let customers pay an invoice; this guide covers Pay Out vendor links. See Manage Payment Links