

Manage vendors (Portal)
Manage vendors (Portal)
Vendors are the entities that offer goods or services to paypoints and organizations. They’re who gets paid in money out (Pay Out) transactions. Once you’ve added a vendor, keeping its record up-to-date is an ongoing task at either the paypoint or organization level. This guide explains how to find, view, update, and remove vendor records in the Payabli Portal. To add new vendors, see Create vendors.
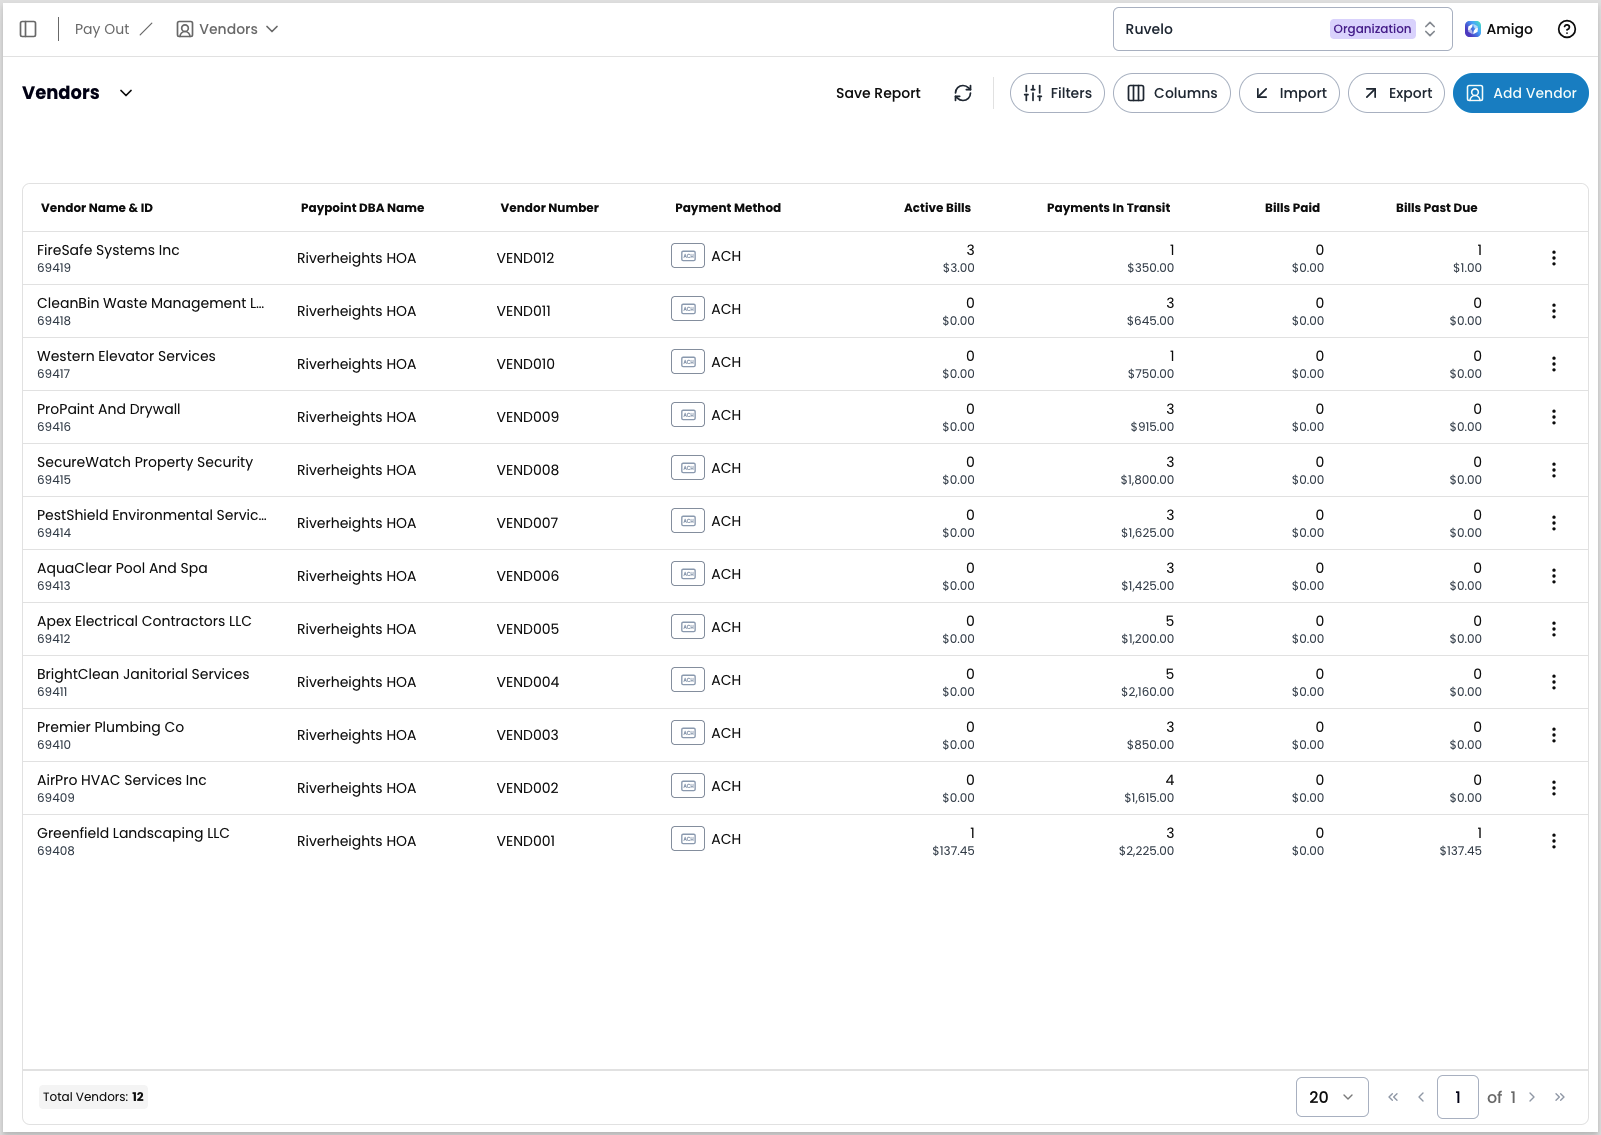
To open the Vendors report, navigate to Pay Out > Vendors. The report lists every vendor for your paypoint or organization, along with an up-to-date total count of all your vendors and recipients. You can manage a vendor from two places: the three-dot menu in its row, or the vendor’s own record panel. The record panel exposes the same actions as buttons and its own three-dot menu, and lets you manage the vendor’s payment methods too.
Find a vendor
The Vendors report can grow long, so use filters to narrow it to the vendor you want. There’s no separate search box — filtering is how you locate a specific record.
Click Filters to open the filter panel. The available filters are grouped by the kind of detail you’re searching on, so pick the group that matches what you already know:
- Vendor information — identifiers such as the vendor/recipient name, vendor number, vendor ID, tax ID, or account number, plus the organization and paypoint the vendor belongs to. Start here when you know who the vendor is.
- Vendor status — active, inactive, or deleted.
- Enrollment status — whether the vendor is enrolled, pending, or declined.
- Payment method — how the vendor gets paid: ACH, paper check, virtual card, managed, Real-Time Payments (RTP), or wire transfer. Use this to find every vendor paid a particular way.
- Bill activity — counts of active, paid, in-transit, past-due, or total bills, each as a minimum-to-maximum range. Use this to surface vendors with past-due bills, for example.
- Contact and address details — date created, email address, remit email, phone number, and billing or remit address.
- Custom fields — any custom fields your organization has configured.
Some things to know about how the filters match:
- For fields that accept more than one selection, the filter returns values that match any selection.
- For string fields, unquoted text matches partially. For example, filtering a name field with
Westernmatches any vendor whose name contains that string. Wrap a value in quotes for an exact match:"Western Elevator Services"returns only that vendor.
Once you’ve set up a filter combination you want to reuse, use Save to save it as a named view. If you have saved reports built from the Vendors report, you can switch between them with the dropdown arrow beside the report name.
View vendor details
To open a vendor’s record, follow these steps:
- Navigate to Pay Out > Vendors.
- Locate the vendor record and click the three-dot icon.
- Select View Details from the menu to open the vendor’s dashboard.
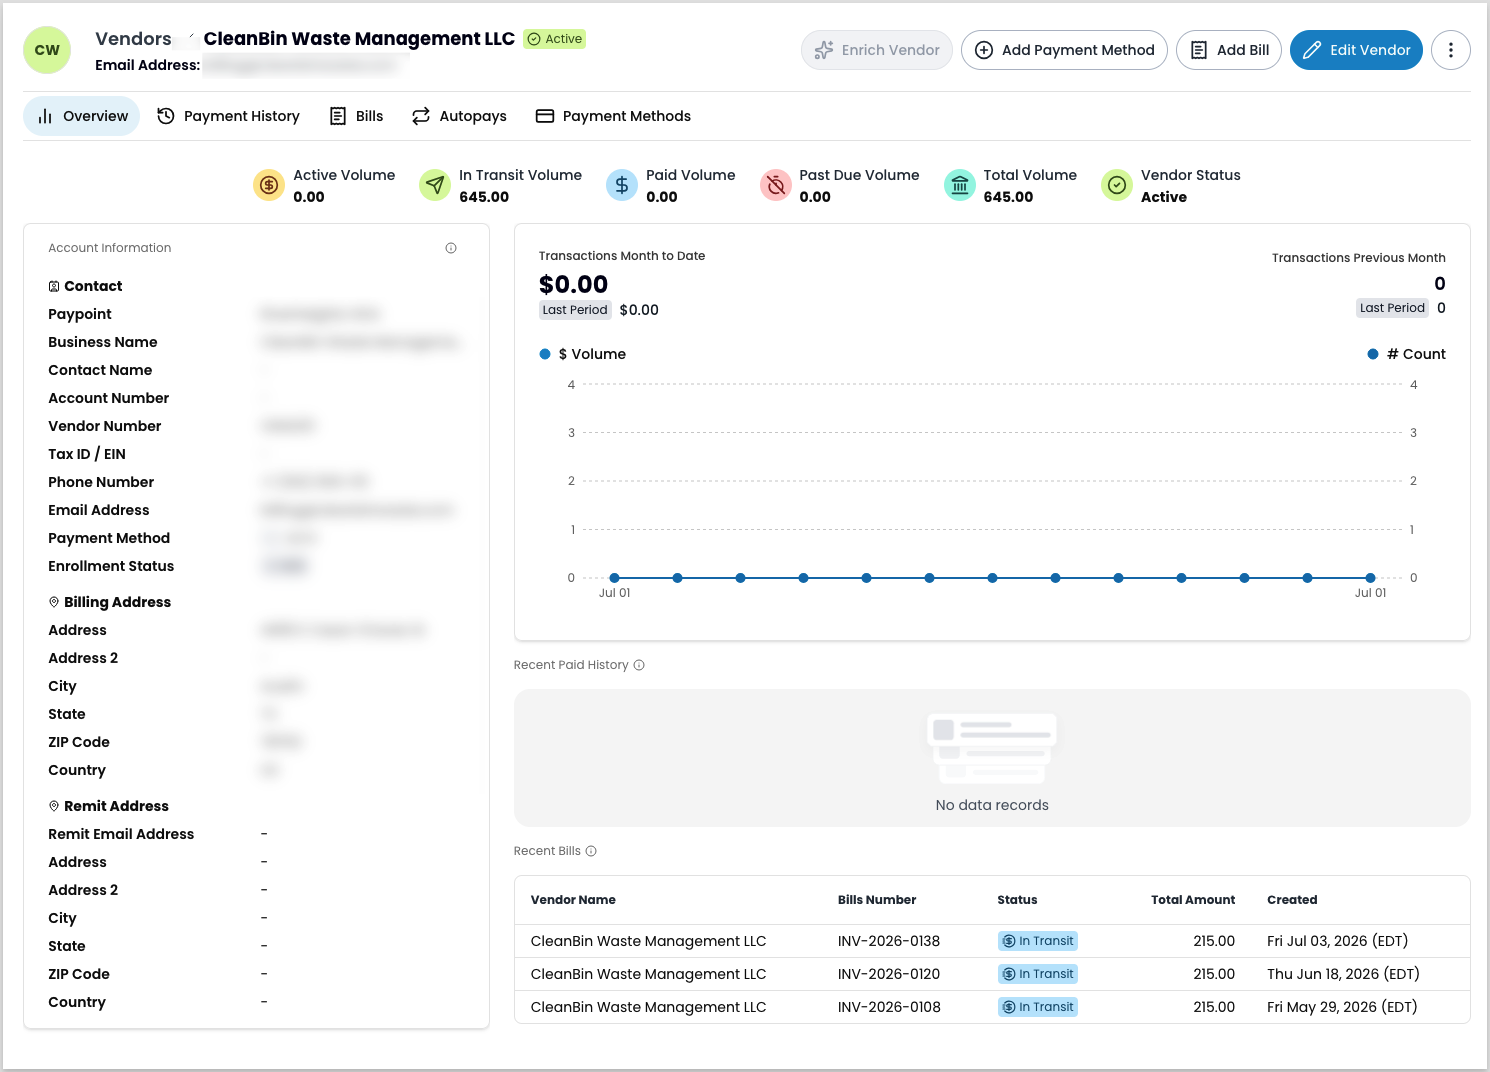
From a vendor record, you can see:
- Account information, including the billing and remit addresses
- A volume summary — active, in transit, paid, past due, and total volume
- Transaction charts for the current and previous month
- Recent paid history and recent bills
Use the tabs to see more: Payment History, Bills, Autopays, and Payment Methods.
You can also take actions directly from a vendor record:
- Add Payment Method — save how the vendor gets paid
- Add Bill — record an amount you owe the vendor
- Enrich Vendor — gather payment and contact information automatically
- Edit Vendor — update account details
Additional actions, including changing the vendor’s status and deleting the vendor, are available from the three-dot menu on the record.
Manage payment methods
A vendor’s payment methods are how Payabli pays them — such as ACH, virtual card, or paper checks. Click Add Payment Method on a vendor record to save one, or open the vendor’s Payment Methods tab to view, set a default, or delete one. For the full steps, see Manage vendor payment methods.
Edit a vendor
Update a vendor’s contact information or billing/remit address after you’ve added them.
To update a vendor’s information, follow these steps:
- Navigate to Pay Out > Vendors.
- Locate the vendor record and click the three-dot icon.
- Select Edit Vendor from the menu to open the Edit vendor modal.
- Update the account information, billing details, remit address, and any custom fields you use.
- Click Save Vendor.
Change a vendor’s status
To activate or deactivate a vendor, follow these steps:
- Navigate to Pay Out > Vendors.
- Locate the vendor record and click the three-dot icon.
- Select Change Status from the menu.
- In the Change Status modal, set the vendor’s status to either Active or Inactive.
- Click Save.
Delete a vendor
Deleting a vendor is permanent and can’t be undone.
To delete a vendor record, follow these steps:
- Navigate to Pay Out > Vendors.
- Locate the vendor record and click the three-dot icon.
- Select Delete Vendor from the menu.
- In the confirmation modal that appears, click Delete if you’re sure you want to permanently delete this vendor.
Export your vendor list
You can download a copy of your current report, including any active filter settings and selected columns.
To export your vendors, follow these steps:
- From the Vendors report, apply any filters or add the columns you want in the export.
- Click Export.
- In the Export Options panel, select any additional columns to include.
- Click Export XLSX or Export CSV.
Pay a bill
The vendor’s three-dot menu also includes bill actions — View Bills, Pay Bills, and Add Bill — so you can start a payment without leaving the vendor record. Each bill represents an amount you owe a vendor. For the full steps, see Manage bills in the UI.
Clicking View Bills takes you to the Bills report filtered for that vendor.
If you click Pay Bills, the Bill Details section of the Pay Bill form is active. You can search for an existing bill for that vendor by bill number, or create a new one.
Enrich a vendor
Vendor enrichment uses AI to automatically gather payment acceptance and contact information for a vendor. To trigger it, click Enrich Vendor on a vendor record. For details, see Vendor enrichment.
Related resources
See these related resources to help you get the most out of Payabli.
Prerequisites
- Create vendors (Portal) - Add a vendor before you can find, view, or update its record
Next steps
- Manage vendor payment methods (Portal) - Manage a vendor’s stored payment methods once you’re on their record