

Manage invoices (UI)
Manage invoices (UI)
Use the Invoices report to track outstanding balances, reconcile payments, and keep invoice records current. Navigate to Pay In > Invoices to open it. To create or send invoices, see Create and send invoices.
Track invoices with reports
The Invoices report lists every invoice in your account. From the report toolbar you can Save Report to reuse a setup, apply Filters, Add Columns, and Export the results.
Use Save Report to save your combination of filters and columns. Click the down arrow beside Invoices to switch between saved reports.
Find invoices with filters
Use filters to find groups of invoices in Payabli. Click Filters to filter by any column. For example, filter by creation date or due date to find invoices that need follow-up.
Filter the view by status to monitor outstanding balances. Click Filters and select a status:
- Draft — created but not yet sent
- Active — sent, awaiting payment
- Past Due — Active or Partially Paid and past its due date
- Partially Paid — payment received but balance remains
- Paid — payment complete
For what each status means and how invoices move between them, see Invoice statuses and lifecycle.
An invoice can also reach a status outside this path:
Canceled — You stop collecting an invoice you no longer expect to be paid. You can cancel an invoice that’s Draft, Active (Open), or Partially Paid, but not one that’s already Paid. Canceling is available through the API only. A canceled invoice keeps its record for your history but stops requesting payment.
Add columns
Select Columns to choose which details appear in the report:
Invoice columns
- Customer Name & Company
- Customer Number
- Email Address
- Phone Number
- Billing Address
- Shipping Address
- Invoice Number
- Frequency*
- Payment Terms*
- Date Created
- Due Date
- Last Payment Date
- Invoice Status
- Paid Amount
- Invoice Amount
- Remaining Amount
- Notes
* Frequency and Payment Terms are inherited values and can’t be edited directly when editing an invoice.
Export the report
To export the report:
- Click Export.
- Select the columns to include.
- Choose Export XLSX or Export CSV.
- For large exports, check progress under See your export queue.
View invoice details
Every invoice’s row has a three-dot menu with all of its actions. To review an invoice, click the three-dot icon and select View Details.
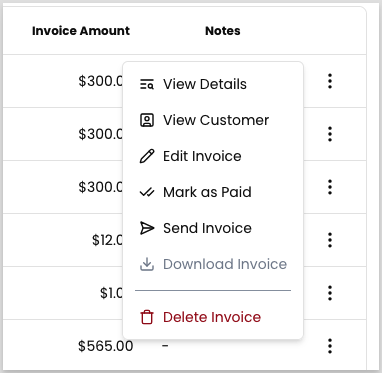
The detail panel opens with the full record. Use the Edit Invoice and Send Invoice buttons at the top right to act without leaving the panel.
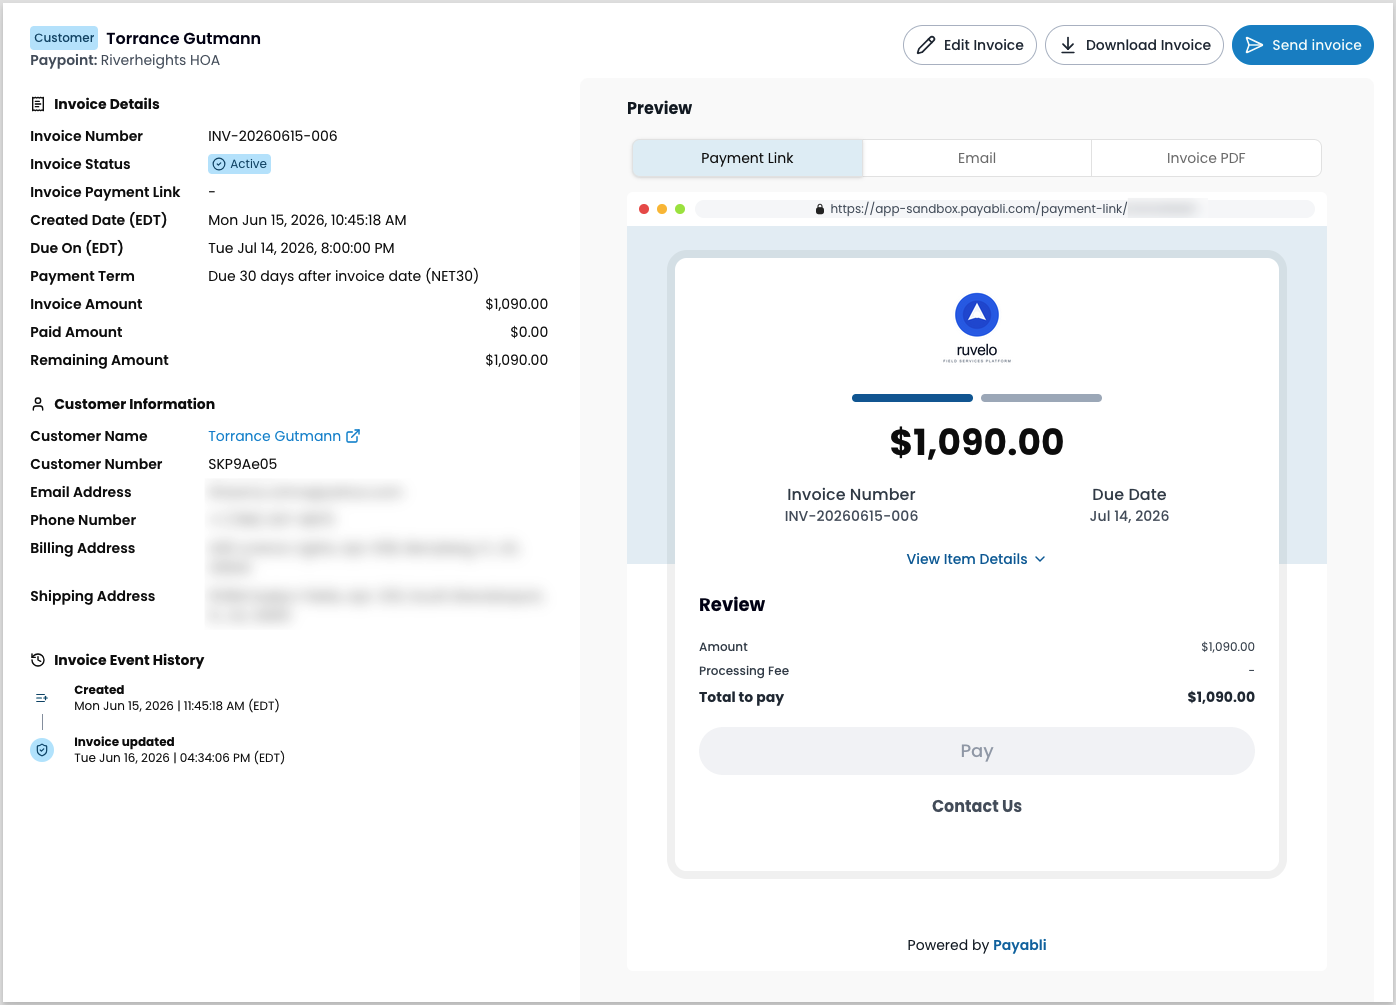
The panel groups everything about the invoice:
- Invoice details — amounts, dates, and payment terms, plus the Invoice Payment Link your customer uses to pay. Watch Remaining Amount to reconcile a Partially Paid invoice. The status badge shows the invoice’s current status.
- Customer information — the customer’s contact and address details, with a link to their full customer record.
- Invoice event history — a timestamped trail of when the invoice was created, updated, sent, and paid. Use it to audit changes during reconciliation.
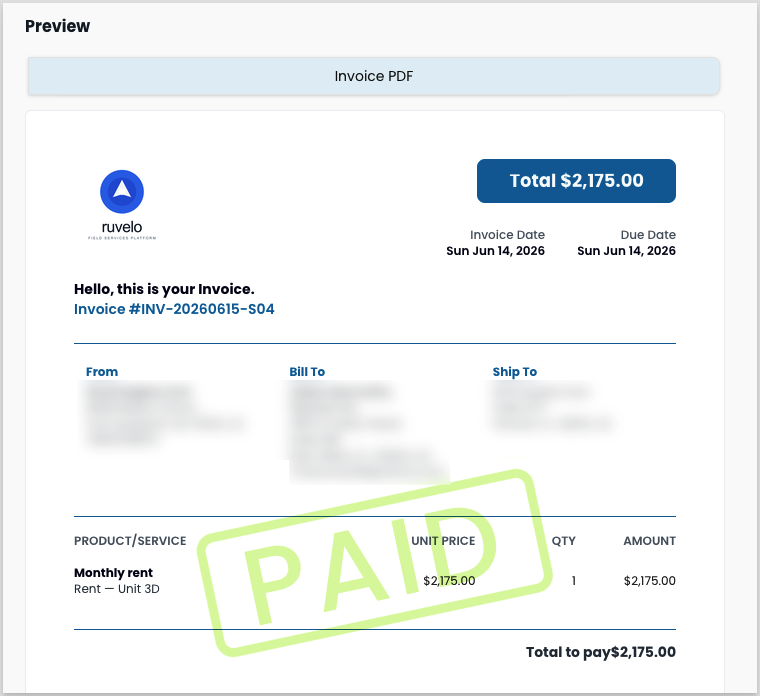
- Preview — how the invoice looks to your customer, across three tabs: Payment Link, Email, and Invoice PDF. When an invoice is paid, the preview shows a watermark and you can only download it as a PDF.
Edit an invoice
Edit an invoice to change customer details, line items, dates, or amounts. Editing opens the full-page edit form.
- Find the invoice you want to edit.
- Click the three-dot icon in the invoice’s row.
- Select Edit Invoice.
- On the edit form, update customer details, invoice numbers, due dates, and line items. Payment Terms isn’t a separate field — it follows the due date you set.
You can also open the edit form from the Edit Invoice button in an invoice’s detail panel.
Download an invoice
Download a PDF copy of an invoice for your records.
- Find the invoice you want to download.
- Click the three-dot icon in the invoice’s row.
- Select Download Invoice to save a PDF copy.
You can also download from the Download Invoice button in an invoice’s detail panel.
Send or resend an invoice
Send an invoice you saved as a draft, or resend one to nudge a customer about an unpaid balance. To send an invoice when you first create it, see Create and send invoices.
- Use filters or browse the report to find the invoice.
- Click the three-dot icon in the invoice’s row.
- Select Send Invoice.
Pay by SMS is an add-on feature — contact Payabli to enable it. When you send by SMS, Payabli prompts customers to opt in if they haven’t already.
You can also send from the Send Invoice button in an invoice’s detail panel.
Mark an invoice as paid
Record a payment collected outside Payabli so the invoice reflects the correct status.
- Find the invoice to mark as paid.
- Click the three-dot icon in the invoice’s row.
- Select Mark as Paid.
- In the modal, enter the payment details — date, amount, reference, and payment method — then confirm.
Delete an invoice
Deleting an invoice is permanent and can’t be undone.
- Locate the invoice to delete.
- Click the three-dot icon in the invoice’s row.
- Select Delete Invoice.
- Follow the prompts in the confirmation modal.
Related resources
See these related resources to help you get the most out of Payabli.
References
- Pay In statuses - Learn about Pay In (money in) statuses