

Manage bills (Portal)
Manage bills (Portal)
Use the Bills report to track what you owe vendors, pay bills, and reconcile payouts. Navigate to Pay Out > Bills to open it. To create a bill, see Create a bill.
This guide is written primarily for on-demand payouts. If your account uses Managed Payables, paying a bill works differently — the vendor chooses their payment method, and Payabli’s enablement team verifies it, instead of you using the Pay Bill and Send Vendor Link actions described below. See Understanding managed payables.
Track bills with reports
The Bills report lists every bill in your account. From the report toolbar you can Save Report to reuse a setup, apply Filters, add columns, and Export the results.
Use Save Report to save your combination of filters and columns. Click the down arrow beside Bills to switch between saved reports.
Find bills with filters
Click Filters to filter by any column — bill details, vendor, payment method, dates, amounts, bill status, or custom fields. For example, filter by due date to find bills that need attention, or by vendor to review everything you owe one supplier.
Filter by bill status to track where bills are in their lifecycle. For what each status means, see Bill statuses and lifecycle.
Export the report
To export the report:
- Click Export.
- Select any additional columns to include.
- Choose Export XLSX or Export CSV.
View bill details
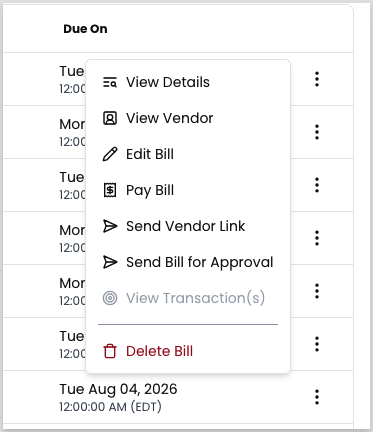
Every bill’s row has a three-dot menu with its actions. Which actions are available depends on the bill’s status, and Payabli grays out the ones you can’t use. To review a bill, click the three-dot icon and select View Details.
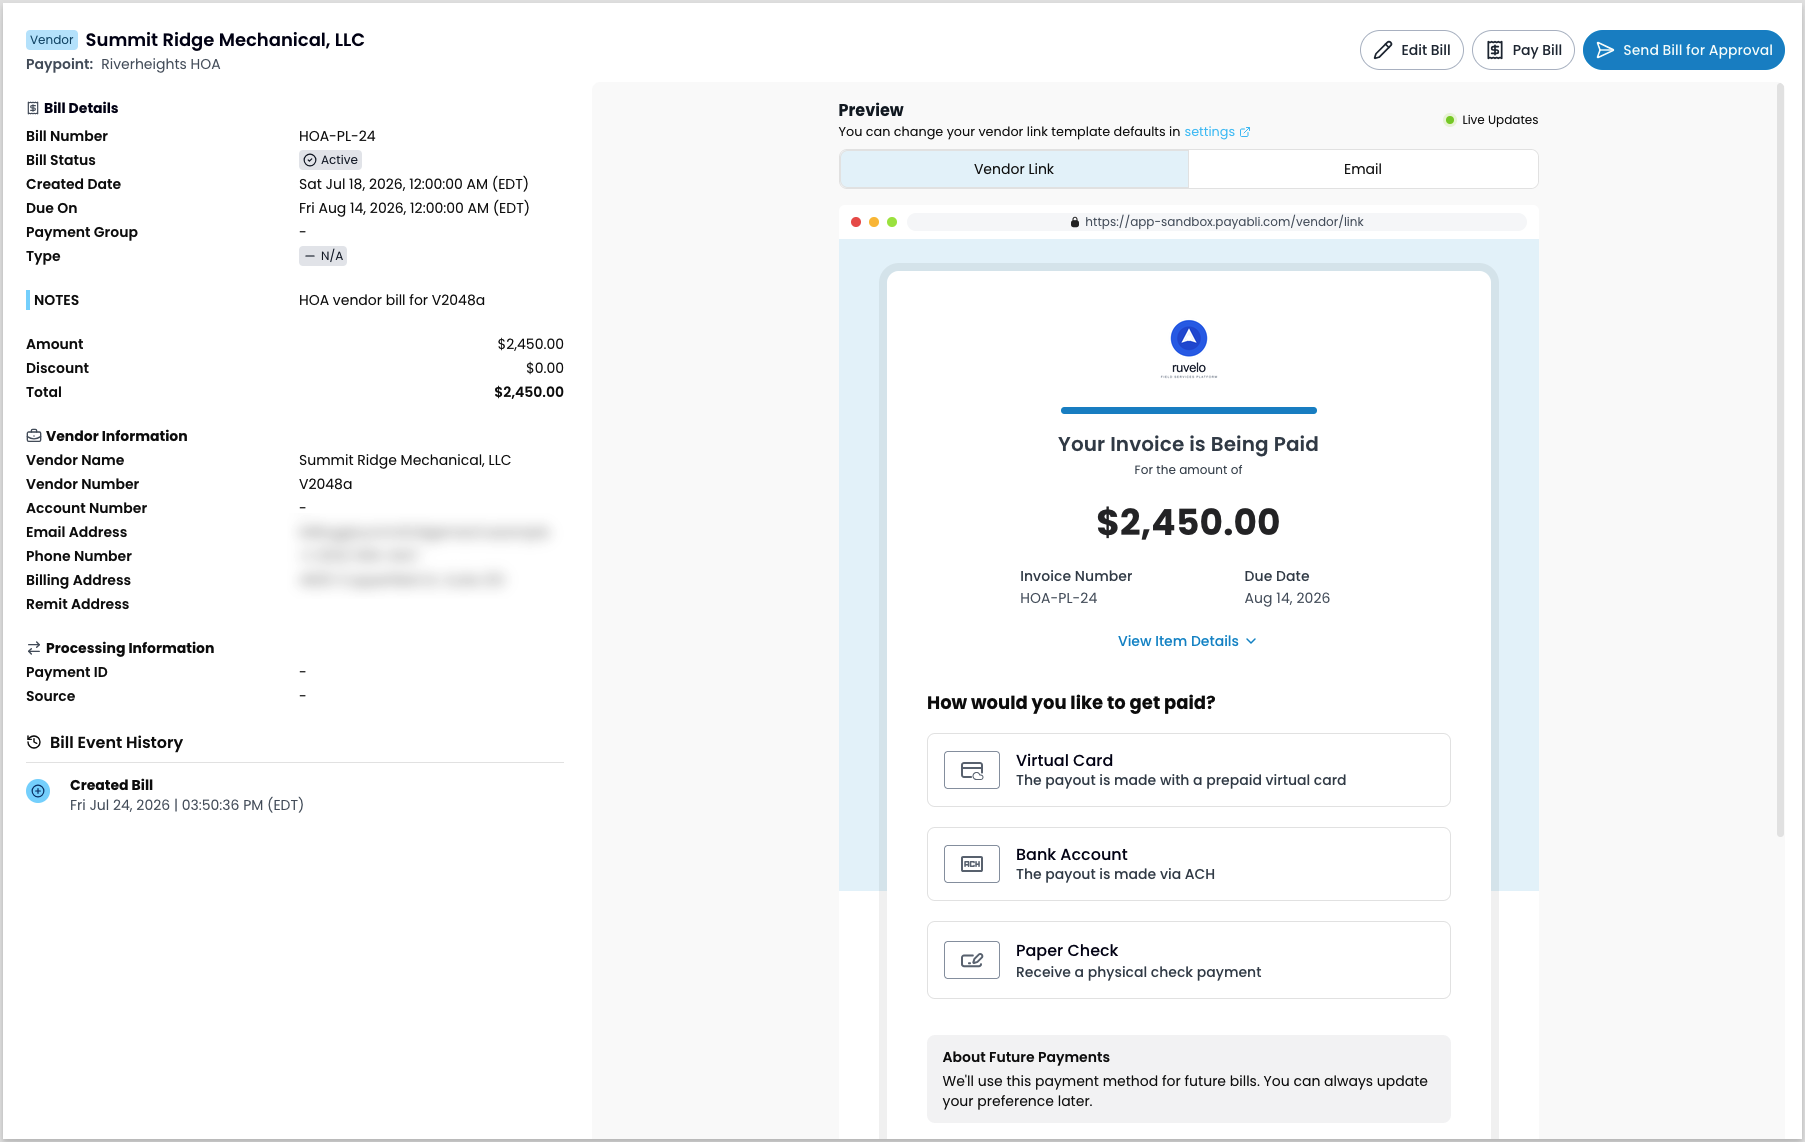
The detail panel opens with the full record. Action buttons at the top let you act without leaving the panel. Which ones appear depends on the bill’s status:
- Edit Bill — open the edit form.
- Pay Bill — pay the bill.
The panel groups everything about the bill:
- Bill details — the bill’s key fields, including amounts and due date.
- Vendor information — the vendor’s contact and remit details, with a link to their full vendor record.
- Preview — how the bill looks to the vendor. The Vendor Link tab shows the page the vendor uses to choose how they’re paid; switch to the Email tab to preview the notification email.
- Processing information — the payment ID and source once a payout exists for the bill.
- Bill event history — a timestamped trail of the bill’s status transitions. Use it to audit how a bill moved from created to paid.
Edit a bill
Edit a bill to change its details — vendor, bill number, due date, line items or amount, advanced options, and even the payment type. Editing reopens the bill in the same form you used to create it.
- Find the bill you want to edit.
- Click the three-dot icon in the bill’s row.
- Select Edit Bill.
- Update the bill’s details, then save or pay the bill as you would when creating it.
You can also open the edit form from the Edit Bill button in a bill’s detail panel.
Pay a bill
Pay a bill to send the vendor their payment. Paying a bill creates the payout that settles it. Only a bill that’s Active or Approved can be paid.
Two actions in the bill’s three-dot menu pay a bill:
- Pay Bill — select a payment method and pay the vendor.
- Send Vendor Link — email the vendor a link so they can choose how they receive the payment.
Pay from the payment panel
Pay the vendor directly with a stored or new payment method.
- Find the bill you want to pay.
- Click the three-dot icon in the bill’s row, then select Pay Bill. A payment panel opens with the bill’s fields locked to its saved values.
- Review the bill details, and add any notes.
- Choose Select how vendor gets paid, then pick a stored payment method or enter new payment method details for the vendor. Optionally, check Save as my default payment method to store it for future payments.
- Click Send Payment.
Send a vendor link
Send the vendor an email with a link where they choose how they’d like to receive the payment.
- Find the bill you want to pay.
- Click the three-dot icon in the bill’s row, then select Send Vendor Link.
- In the confirmation modal, review the email the link will be sent to. Add more addresses to send the link to others.
- Click Accept to send the email.
View transactions
A bill’s payments appear in the Transactions report. Click the three-dot icon in the bill’s row and select View Transaction(s). Payabli opens Pay Out > Transactions filtered to the bill’s ID, where you can see the payout that settles the bill and track its status.
Delete a bill
Deleting a bill is permanent and can’t be undone. You can’t delete a bill that’s In Transit or Paid.
- Find the bill you want to delete.
- Click the three-dot icon in the bill’s row.
- Select Delete Bill.
- In the confirmation modal, click Delete.
Related resources
See these related resources to help you get the most out of Payabli.
References
- Pay Out statuses - Learn about Pay Out statuses