

Manage digital wallet domains
Apple Pay and Google Pay only work on domains that Payabli has verified as yours. A domain registered this way is a payment method domain, which is also what the API calls it. Registering one ties wallet traffic to sites you control, which is how Payabli keeps wallet transactions coming from known websites.
Payabli holds the accounts that Apple and Google require, so you don’t need your own developer account, encryption keys, certificates, or merchant identifiers. Payabli registers your domains under its own accounts. The domain is the part you own, which is why setup asks you to prove you control it. Proving it means hosting a file that Payabli gives you.
Every domain belongs to an organization or a paypoint, and that owner is where anyone goes to change or remove it. To learn how the two levels of access differ, see Access points.
For the API version of everything on this page, see Manage Apple Pay (API) and Manage Google Pay™ (API).
Adding and cascading domains takes an admin or a manager role. Deleting a domain takes an admin role. Members and viewers can see the Digital Wallets section but can’t change anything in it, and some actions there look available but return an error.
Add and verify a domain
Add a domain when you launch checkout on a new site, or when you add a subdomain that needs to accept wallet payments.
Most partners register one domain and are done. A platform that hosts its merchants on paths under a single app domain, such as app.example.com/{merchant-id}, verifies app.example.com at the organization and cascades it, and every merchant below inherits it. Verification covers the domain and every path under it, so those merchants never register anything. A subdomain such as pay.example.com is a separate domain and needs its own verification.
A merchant registers its own domain only when your platform lets merchants bring their own checkout domain. That merchant’s admin runs the same flow from their paypoint. Two things differ: the domains they add belong to that paypoint alone, and there’s nothing below them to cascade to.
To add a domain, follow these steps.
You need write access to the domain’s web server to host the verification file. Get that access before you start, because the check expects the file to be live when you run it.
Open the add-domain flow
Go to Developers > Digital Wallets, then click Add Domain. Merchant users find the same section at the paypoint level.
Enter your domains
The Digital Wallet Domain dialog groups domains by owner.
PSP Domains lists the payment service provider’s own domains, which means Payabli’s. Organization domains lists the organization’s, and at a paypoint, Paypoint domains lists that paypoint’s.
Enter your domain in the Domain Name box under the group that should own it. To verify more than one domain, add each additional domain beneath the first.
Where you’re signed in decides what you can add. At an organization you add organization domains. At a paypoint you can see the organization’s domains but can only add paypoint domains. To register a domain for one merchant, switch to that merchant’s paypoint before you start.
The owner decides how far the domain reaches:
- A paypoint domain covers that paypoint only. Nothing inherits it.
- An organization domain can cascade to every child entity below it, including sub-organizations and their paypoints. See Cascade a domain.
The domain must be public. It can’t be localhost, behind a VPN, or password-protected.
Download the domain-verification file
Click Download Domain-verification File, then click Next. One file covers every domain you entered, and the portal serves the file for the environment you’re signed in to.
Only Apple Pay reads this file. The flow gives you the file no matter which wallets you accept, so if you’re setting up Google Pay alone, you can take it and skip the hosting step.
Host the file on each domain
Host the file at /.well-known/apple-developer-merchantid-domain-association on each domain you entered. For a domain named example.com, that’s https://example.com/.well-known/apple-developer-merchantid-domain-association.
The sandbox file and the production file aren’t interchangeable, and both belong at that one path, so a domain can hold one environment’s file at a time. Use a separate subdomain for each environment, such as sandbox-pay.example.com for sandbox and pay.example.com for production.
Serve the file as text/plain. Some web servers serve a file with no extension as text/html by default, which fails verification.
Run the check
Click Verify.
Payabli checks each domain and saves it whether the check passes or fails, and a notification confirms the domain was saved. A domain that passes has that wallet switched on right away, as long as the wallet is active for your organization or paypoint. A domain that fails is still on the list, marked with an error you can read from the report.
To download the verification file again, click Back and repeat the flow.
Leaving before you click Verify adds nothing. After Verify, the domain is on the list whatever you click next.
How verification differs by wallet
The domain list shows Apple Pay and Google Pay separately because each wallet runs its own check against the same domain. One can pass while the other fails, and the difference is the verification file:
- Apple Pay reads the file. It has to be at the expected path, and it has to be valid.
- Google Pay checks that the domain responds. It doesn’t read the file, so which environment’s file sits at the path doesn’t affect it.
A domain served with the wrong content type therefore activates Google Pay while Apple Pay fails. A domain set up for Google Pay alone, with the file never hosted, reads the same way. The list shows one wallet live and the other not, which is working as intended rather than a half-finished setup.
Troubleshoot a failed check
A failed domain carries an error icon beside its name in the report. Point at the icon for the message, such as Unable to validate the domain. Verification file content is not valid, or open the domain’s details for the same thing. Two failures come up most.
- Payabli couldn’t reach the domain or find the file. Confirm the domain resolves publicly, then confirm the file sits at
/.well-known/apple-developer-merchantid-domain-association. - Payabli found the file but couldn’t read it as valid. The content type causes most of these. Serve the file as
text/plain, not asapplication/octet-streamor whatever else a server picks for a file with no extension. The other cause is the wrong environment’s file, because a production check fails against the sandbox file and the reverse.
A redirect causes a third failure. Payabli verifies the domain you entered, not the one a visitor ends up on, so a domain that redirects from example.com to new.example.com fails the check. Register the destination domain instead.
A failed check also shows up away from the report. The ExpressCheckout component hides the Apple Pay button on every browser when you set crossBrowser to true on an unverified domain, so a button missing everywhere points back here. To learn more, see Apple Pay compatibility.
Turn a wallet off or back on
A wallet that passes its verification check is switched on for that domain without anything else from you. The toggles in the domain list are how you change that afterward, and each wallet has its own.
To stop accepting a wallet on a domain, click its active toggle, then click Deactivate.
To start accepting it again, follow these steps.
- Find the domain in the list.
- Click the toggle in the Apple Pay or Google Pay column.
- Click Activate in the confirmation modal.
A domain that failed the file check carries an error icon beside its name. Apple Pay won’t switch on there, but Google Pay still will, as long as the domain itself resolves. That’s the split in practice rather than in theory. See How verification differs by wallet.
The toggle is also how you retry. Clicking it on a failed domain runs the check again rather than forcing the wallet on, so fix the hosting problem first and then click the toggle. A check that passes switches the wallet on for that domain.
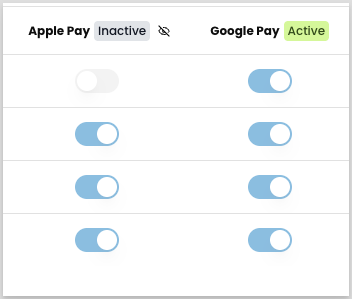
If a wallet is off across every domain at once, the per-domain toggles aren’t the cause, and they won’t look like it either. A domain’s toggle can sit in the on position while the column heading reads Inactive. The two record different things: the toggle is that domain’s own setting, and the heading is whether the wallet runs anywhere. The heading overrides the toggles. Read it first. See Activate a wallet for your organization or paypoint.
The toggles are unavailable on an inherited domain. See Inherited domains.
Activate a wallet for your organization or paypoint
A domain decides where a wallet can run. Whether you offer that wallet at all is a separate setting that covers every domain at once, and a domain can’t accept a wallet you’ve switched off.
The setting follows the domains. A partner sets it at the organization, covering every domain the organization owns, and a paypoint admin sets it for the domains their own paypoint owns. A paypoint whose domains all arrived through a cascade has nothing of its own to switch, so the organization’s setting governs and the paypoint can’t change it. See Inherited domains.
While a wallet is inactive, Payabli doesn’t offer it anywhere. Apple Pay switched off means Apple Pay isn’t among the payment options when you build an invoice.
To change it, click Manage Wallets, then switch Apple Pay or Google Pay on or off under Wallets activation.
The Apple Pay and Google Pay column headings carry the current state, reading Active or Inactive, so you can read this setting off the report without opening the control. At a paypoint working from inherited domains, the heading reports the organization’s setting.
Switching a wallet off doesn’t change the domain toggles, and you can still set them while it’s off. This setting overrides them, so the report can show a column of on toggles for a wallet that isn’t running. Switch the wallet back on and those domains resume on their own, with nothing to re-toggle.
At the organization level, if any of your domains haven’t cascaded, the Cascade Domains dialog warns you before the change goes through and names the domains it means. Click Ignore & Continue to go ahead anyway, or Cancel to cascade them first.
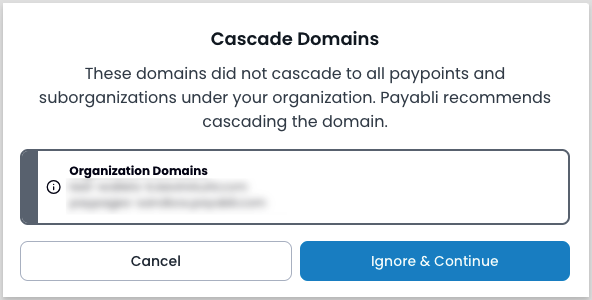
The warning doesn’t block the change, and a domain that never cascaded stays missing from your paypoints and sub-organizations either way. See Cascade a domain.
For the API version of this setting, see Activate Apple Pay (API) and Activate Google Pay™ (API).
View a domain’s details
Domain details are where you find out why a verification check failed.
To open them, find the domain in the list, click its three-dot icon, then click View details.
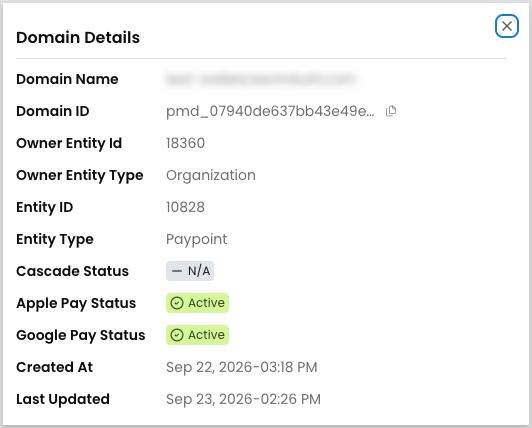
The Domain Details view lists the domain’s fields as rows, including the ones the report hides. Two parts of it do the work:
- The verification message at the top. A domain that failed its check opens with the reason in a banner, which is the fastest way to tell a missing file from an unreadable one.
- Apple Pay Status and Google Pay Status. These are separate rows, so a domain reading
Inactivefor Apple Pay andActivefor Google Pay tells you the file is the problem, not the domain.
Columns in the Digital Wallets report
The report lists every domain for your organization or paypoint. These are the columns that need explaining.
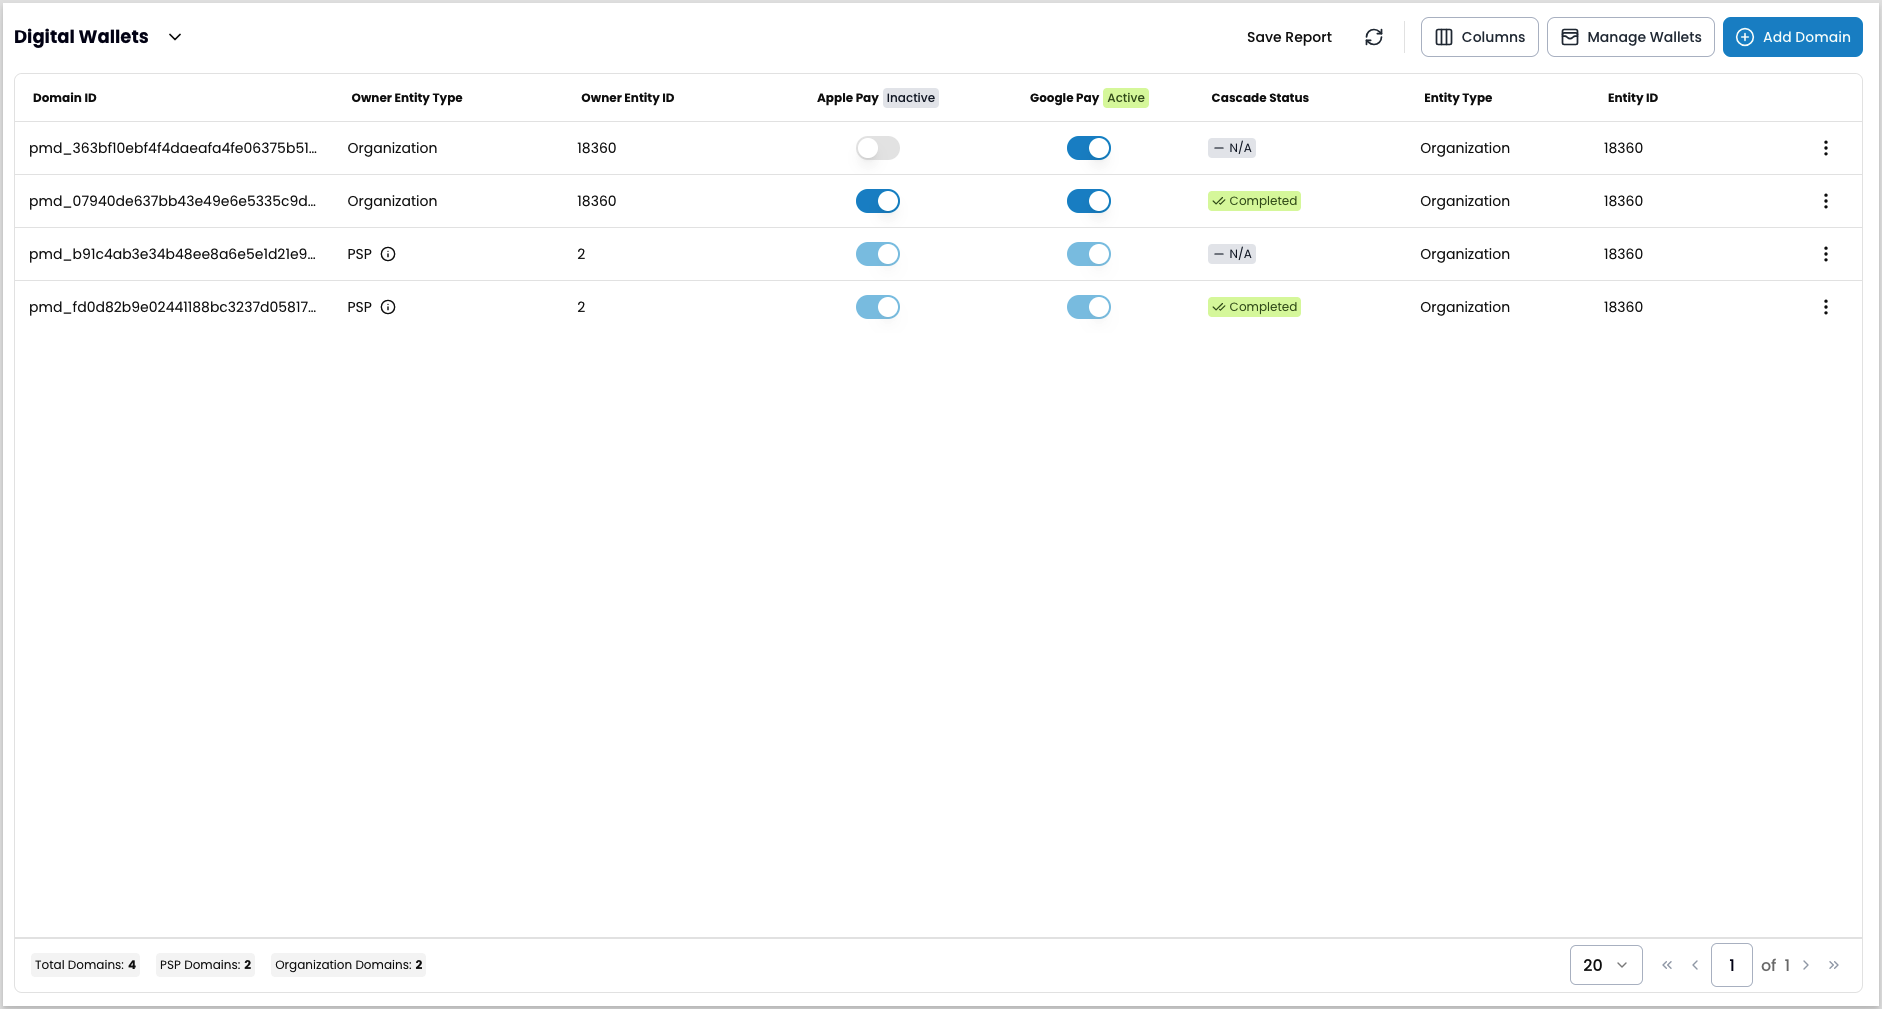
Domain ID, Type, Created At, and Updated At are hidden by default. Show them from Columns, which you’ll need for Domain ID when you’re filing a support request or moving to the API.
Cascade a domain
Some configuration cascades from an organization down to its child entities, whether those are sub-organizations or paypoints. Verified domains are one of them. Cascading a domain gives every child entity the domain without anyone verifying it again, and Payabli recommends it.
To cascade a domain, find it in the list, click its three-dot icon, click Cascade Domain, then click Save to confirm.
A cascade runs as a background job, so it doesn’t finish instantly. Track it in the Cascade Status column, which reads In Progress while the job runs and Completed when it finishes.
The column reports the cascade from where you’re signed in, not the domain’s history. A domain reads N/A when the entity you’re signed in to hasn’t cascaded it. That includes every domain you inherited, even though a cascade is what delivered it.
A cascade also covers entities you create later. A sub-organization added after the cascade already has the domain, and its verification carries over, so nobody has to host the file again.
A cascaded domain is read-only at the child entity. See Inherited domains.
Inherited domains
A domain that reached an entity through a cascade is read-only there. The wallet toggles and Delete domain don’t work at the child entity, so change or remove the domain from the entity that owns it. The same goes for the wallet-level setting that gates those domains: a paypoint working entirely from inherited domains can’t change it. See Activate a wallet for your organization or paypoint.
This is a limit of ownership, not of roles, so a higher role doesn’t unlock it. A partner admin signed in at the paypoint hits the same wall. For the roles that do gate domain work, see the note in Add and verify a domain.
A read-only domain’s toggles appear faded in the report, which is the quickest way to spot one. That includes domains you inherited and the PSP domains Payabli owns, which appear in your report alongside your own.
The portal isn’t otherwise consistent about how it tells you. Some controls are disabled, and others let you click and then return an error. The answer is the same either way: go to the owner.
To tell an inherited domain from one you registered, compare the Entity Type and Owner Entity Type columns. When they differ, the domain came from a cascade. See Columns in the Digital Wallets report.
Delete a domain
Deleting a domain from an organization removes it from every sub-organization and paypoint that inherited it. Those entities stop accepting Apple Pay and Google Pay on that domain.
Deleting a domain takes an admin role. A manager who can add and cascade domains can’t delete one.
Delete a domain from the entity that created it. The action isn’t available anywhere it was inherited. See Inherited domains.
To delete a domain, find it in the list, click its three-dot icon, click Delete domain, then confirm.
The confirmation dialog warns that deleting the domain affects every paypoint and sub-organization that uses it. A domain with nothing below it, such as one a paypoint owns, gets no such warning, so the dialog tells you whether anyone else loses the domain along with you.
You can add a domain again after deleting it. Re-adding runs the same flow, verification included, so a domain whose file is still hosted passes the check on the way back in.
Related resources
See these related resources to help you get the most out of Payabli.
Prerequisites
- Entities overview - Domains belong to an organization or a paypoint, so the entity model decides who inherits one and who can remove it
References
- ExpressCheckout UI - Learn how to use the ExpressCheckout UI component on your site or in your app to securely accept digital wallet payments